
Are you frustrated because your Jackery Bolt power bank isn’t charging? It’s a common issue, and often a quick fix is all it takes to get your portable power back up and running. A faulty cable or incorrect power source can easily prevent charging, but there are several other potential causes.
This comprehensive guide will walk you through everything you need to know about charging your Jackery Bolt, from the fastest charging methods and troubleshooting common problems to preventative maintenance. We’ll cover everything from identifying the correct charging inputs to diagnosing more complex issues, ensuring you can reliably power your devices on the go. By the end of this article, you’ll be confident in your ability to get your Jackery Bolt charging efficiently and effectively.
Common Causes of Jackery Bolt Not Charging
Several factors can prevent your Jackery Bolt from charging. Here’s a breakdown of the most common culprits:
Faulty Charging Cable
The most frequent cause is a damaged or low-quality USB cable. Cables can fray internally, leading to intermittent or no charging.
Incorrect Power Source
Using a power source that doesn’t deliver enough power (low amperage) can result in slow or no charging. Avoid using outdated USB ports or phone chargers with low output.
Dirty Charging Port
Dust, lint, or debris can accumulate in the charging port, obstructing a solid connection.
Software Glitch
Rarely, a temporary software glitch within the power bank itself can cause charging issues.
Battery Issues
Older Jackery Bolt units may experience battery degradation over time, reducing their capacity and potentially impacting charging.
How to Fix Jackery Bolt Not Charging
Here are several methods to get your Jackery Bolt charging again, starting with the simplest solutions:
Method 1: Check the Cable and Power Source
This is the quickest and easiest fix.
Diagnosing the Issue
Visually inspect the USB cable for any signs of damage (fraying, bending, exposed wires). Test the cable with another device to confirm it’s working correctly. Try a different USB wall adapter or computer USB port.
Fix Steps
- Replace the Cable: Use a known-good USB-A to Micro-USB cable (the Jackery Bolt uses Micro-USB).
- Try a Different Power Source: Connect the Jackery Bolt to a different USB wall adapter (5V/2A is recommended) or a computer USB port. Avoid using USB hubs.
- Test a Wall Outlet: Ensure the wall outlet you are using is functioning correctly.
Testing
Plug the Jackery Bolt into the new cable and power source. Observe the charging indicator lights – they should illuminate, indicating charging has begun.
Method 2: Clean the Charging Port

Dirt and debris can block the connection.
Diagnosing the Issue
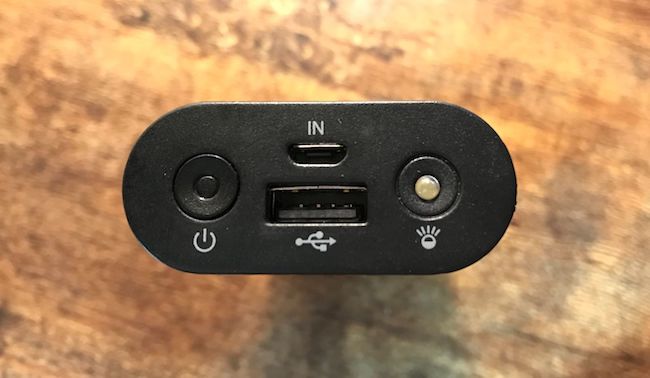
Visually inspect the Micro-USB port on the Jackery Bolt for any visible debris.
Fix Steps
- Power Off: Ensure the Jackery Bolt is powered off.
- Use Compressed Air: Gently blow compressed air into the charging port to dislodge any dust or lint. Do not use excessive force.
- Use a Non-Conductive Tool (Optional): If compressed air doesn’t work, carefully use a wooden or plastic toothpick to gently remove any stubborn debris. Avoid metal objects, as they can cause a short circuit.
Testing
Plug in the charging cable and power source. If the indicator lights illuminate, the port cleaning was successful.
Method 3: Reset the Jackery Bolt
A reset can resolve minor software glitches.
Diagnosing the Issue
If the charging indicator flickers erratically or the device behaves unusually, a reset might be necessary.
Fix Steps
- Press and Hold: Press and hold the power button on the Jackery Bolt for approximately 10-15 seconds.
- Release: Release the power button. The device should power off and then restart.
Testing
Plug in the charging cable and power source after the reset. Check if the charging indicator lights illuminate.
Method 4: Deep Discharge (If Possible)

For older units, sometimes a deep discharge can help recalibrate the battery. Note: This is not always recommended and may void your warranty. Proceed with caution.
Diagnosing the Issue
If the Jackery Bolt isn’t holding a charge or is displaying inaccurate battery levels, a deep discharge might help.
Fix Steps
- Completely Drain: Allow the Jackery Bolt to completely discharge its battery by using it to power devices until it shuts off.
- Charge Fully: Once discharged, connect it to a 5V/2A power source and allow it to charge fully.
Testing
Monitor the charging process and battery level indicator.
How to Prevent Future Charging Issues
Preventative maintenance can significantly reduce the likelihood of charging problems.
Use Quality Cables
Invest in durable, high-quality USB cables from reputable brands.
Protect the Charging Port
Avoid exposing the charging port to dust, dirt, and moisture.
Proper Storage
Store the Jackery Bolt in a cool, dry place when not in use.
Regular Use
Periodically charge and discharge the power bank, even when not actively using it, to maintain battery health.
Avoid Extreme Temperatures
Do not expose the Jackery Bolt to extreme heat or cold, as this can damage the battery.
Pro Tips for Jackery Bolt Charging
- Fastest Charging: Use a 5V/2A power adapter for the fastest charging speeds.
- Charging Indicators: Understand the LED indicator lights. Typically, blinking lights indicate charging, while solid lights indicate a full charge. Refer to your Jackery Bolt’s manual for specifics.
- Avoid Overcharging: While the Jackery Bolt has overcharge protection, it’s best to disconnect it once fully charged.
- Cable Management: Prevent cable damage by avoiding tight bends or kinks.
- Battery Health: For optimal battery health, avoid fully discharging the Jackery Bolt frequently.
Professional Help
When to Seek Professional Assistance
- The Jackery Bolt is physically damaged (cracked casing, bent pins).
- The charging port is severely damaged.
- The device doesn’t power on even after multiple troubleshooting steps.
- The battery is swelling or showing other signs of damage.
Finding a Repair Service
Contact Jackery’s customer support for authorized repair centers or warranty claims.
Typical Costs
Repair costs vary depending on the extent of the damage. Expect to pay for labor and potentially replacement parts.
FAQ
Q: How long does it take to fully charge a Jackery Bolt?
A: Typically, it takes 3-6 hours to fully charge a Jackery Bolt using a 5V/2A power adapter.
Q: Can I charge my Jackery Bolt with a USB-C charger?
A: The Jackery Bolt uses a Micro-USB port, so you’ll need a USB-A to Micro-USB cable. Using a USB-C charger directly is not possible without an adapter.
Q: What do the LED indicator lights mean?
A: The LED lights indicate the charging status and battery level. Refer to your Jackery Bolt’s user manual for a detailed explanation of the light patterns.
Q: Is it bad to leave my Jackery Bolt plugged in after it’s fully charged?
A: The Jackery Bolt has overcharge protection, so it’s generally safe to leave it plugged in. However, to maximize battery health, it’s best to disconnect it once fully charged.
Get Your Jackery Bolt Working Again
By following these steps, you’ve learned how to diagnose and fix common charging issues with your Jackery Bolt. Remember to start with the simplest solutions – checking the cable and power source – and work your way through the more advanced troubleshooting methods.
Don’t let a dead power bank ruin your adventures!
Have you successfully fixed your Jackery Bolt? Share your experience in the comments below to help other readers!