
Dealing with power outages or wanting to reduce your reliance on the grid? Building your own solar generator is a fantastic solution! It might seem daunting, but with the right knowledge and tools, you can create a reliable power source for emergencies, camping, or off-grid living. This guide will walk you through the process, from understanding the components to assembling and testing your homemade solar generator. We’ll start with a quick overview of the core parts and then dive into a detailed, step-by-step build.
This comprehensive guide goes beyond a simple build. We’ll cover everything from choosing the right components for your needs and budget, to detailed assembly instructions, safety precautions, and troubleshooting tips. By the end of this article, you’ll have the confidence and knowledge to build a solar generator that meets your specific power requirements and provides you with peace of mind.
What You’ll Need for a Homemade Solar Generator
| Item | Quantity | Specifications | Estimated Cost |
|---|---|---|---|
| Solar Panel(s) | 1-4 | 100W-200W each, 12V | $100 – $400 |
| Deep Cycle Battery | 1-2 | 12V, 50Ah-100Ah (AGM, Gel, or Lithium) | $100 – $300 |
| Charge Controller | 1 | PWM or MPPT, 10A-30A (depending on panel wattage) | $30 – $150 |
| Inverter | 1 | Pure Sine Wave, 300W-1000W (depending on power needs) | $50 – $200 |
| Battery Cables | 2-4 | Red & Black, 4-6 AWG | $10 – $30 |
| Fuse Holder & Fuses | 1-2 | Appropriate Amp Rating for Battery & Inverter | $5 – $15 |
| Terminal Connectors | As Needed | Ring Terminals, Spade Terminals, etc. | $5 – $10 |
| Enclosure | 1 | Plastic Container, Toolbox, or Wooden Box | $20 – $50 |
| Voltmeter/Multimeter | 1 | For testing and monitoring | $20 – $50 |
Phase 1: Understanding the Components
Before you start building, it’s crucial to understand what each component does and how they interact.
Solar Panels: The Energy Source
Solar panels convert sunlight into DC electricity. The wattage determines how much power they can generate. For a small solar generator, 100W-200W panels are a good starting point.
Deep Cycle Battery: The Energy Storage
The battery stores the DC electricity generated by the solar panels. Deep cycle batteries are designed to be discharged and recharged repeatedly, unlike car batteries. AGM, Gel, and Lithium batteries are common choices, with Lithium offering the best performance and lifespan but at a higher cost.
Charge Controller: The Regulator
The charge controller regulates the voltage from the solar panels to prevent overcharging the battery, which can damage it. PWM (Pulse Width Modulation) controllers are simpler and cheaper, while MPPT (Maximum Power Point Tracking) controllers are more efficient, especially in cloudy conditions.
Inverter: The Power Converter
The inverter converts the DC electricity stored in the battery into AC electricity, which is what most household appliances use. Choose a pure sine wave inverter for sensitive electronics like laptops and phones.
Phase 2: Assembling the Solar Generator
Step 1: Preparing the Enclosure
Choose a suitable enclosure that’s large enough to house all the components. Drill holes for ventilation and cable routing.
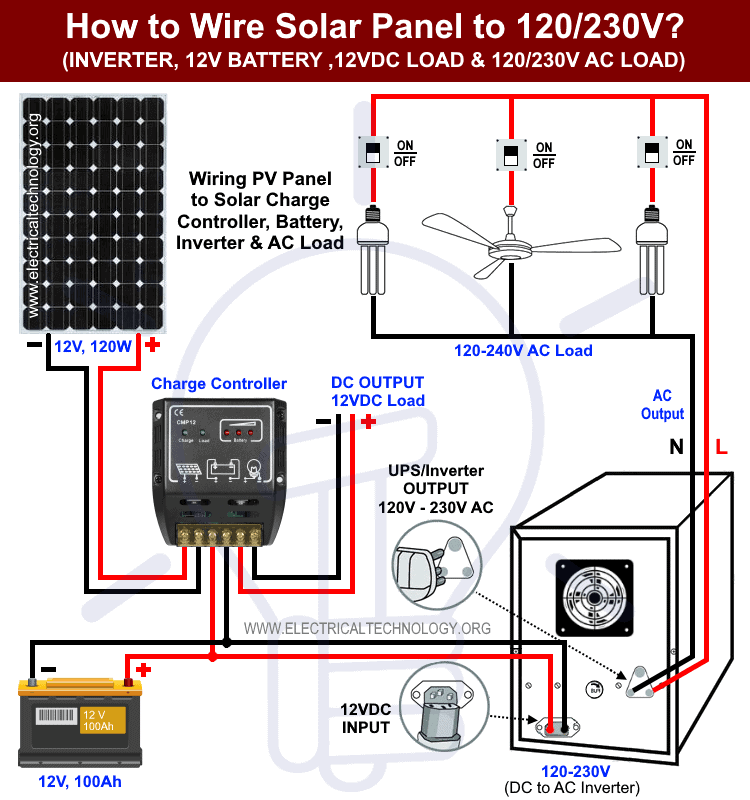
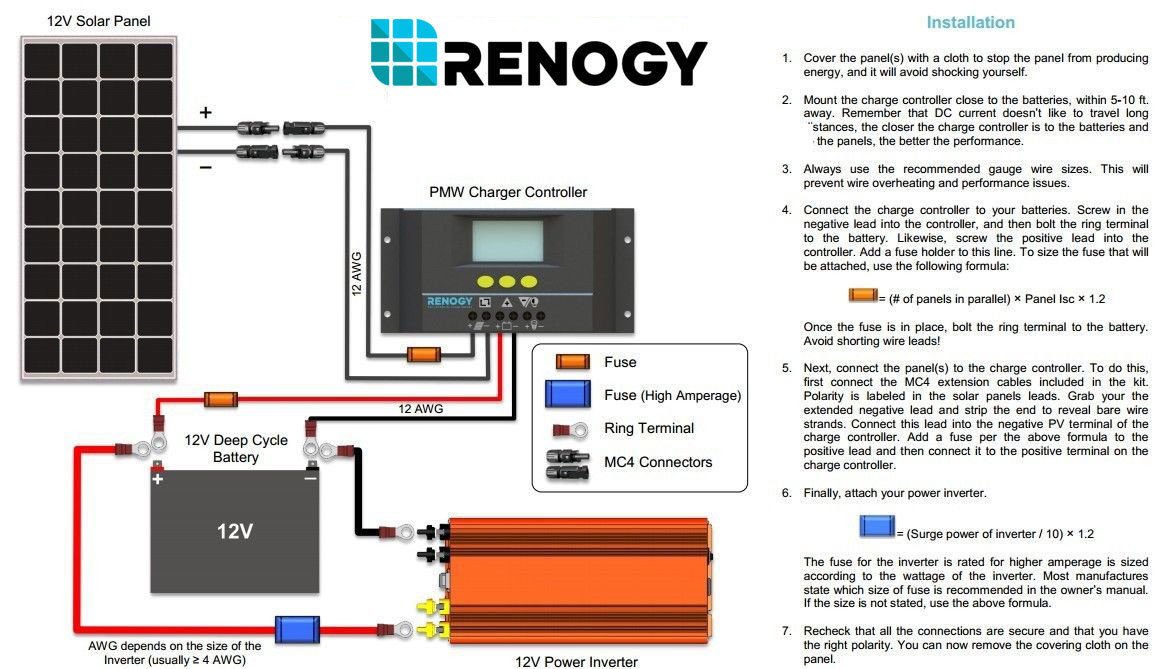
Step 2: Connecting the Solar Panel to the Charge Controller
- Connect the positive (+) wire from the solar panel to the positive (+) solar input terminal on the charge controller.
- Connect the negative (-) wire from the solar panel to the negative (-) solar input terminal on the charge controller.
Step 3: Connecting the Charge Controller to the Battery
- Connect the positive (+) wire from the charge controller’s battery output terminal to the positive (+) terminal of the battery. Important: Add a fuse holder with an appropriately sized fuse (e.g., 30A-50A) close to the battery on the positive wire.
- Connect the negative (-) wire from the charge controller’s battery output terminal to the negative (-) terminal of the battery.
Step 4: Connecting the Inverter to the Battery
- Connect the positive (+) wire from the inverter to the positive (+) terminal of the battery. Important: Add a fuse holder with an appropriately sized fuse (e.g., 50A-100A) close to the battery on the positive wire.
- Connect the negative (-) wire from the inverter to the negative (-) terminal of the battery.
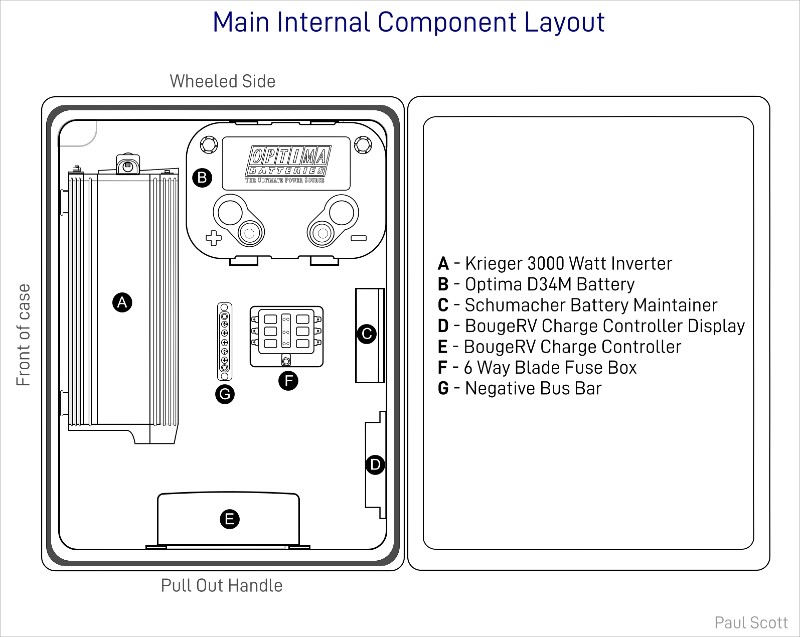
Step 5: Securing the Components
Securely mount all components inside the enclosure using screws, brackets, or adhesive. Ensure adequate ventilation for the battery and inverter.
Phase 3: Testing and Troubleshooting
Testing the System
- Check Voltages: Use a voltmeter to verify that the battery is charging when the solar panel is exposed to sunlight.
- Test the Inverter: Plug a small appliance (e.g., a lamp) into the inverter and ensure it powers on.
- Monitor Battery Level: Regularly monitor the battery voltage to avoid over-discharging.
Troubleshooting Common Issues
- Solar panel not charging battery: Check all connections, ensure the charge controller is properly configured for your battery type, and verify the solar panel is receiving sunlight.
- Inverter not working: Check the battery voltage, fuse, and inverter connections.
- Low power output: Ensure the solar panel is positioned for maximum sunlight exposure and the battery is fully charged.
Pro Tips for a Successful Build
- Battery Chemistry Matters: Lithium batteries are more expensive upfront but offer significantly longer lifespan, higher energy density, and better performance.
- Proper Wiring: Use appropriately sized wires and secure connections to minimize voltage drop and prevent overheating.
- Ventilation is Key: Batteries can release gases during charging, so ensure adequate ventilation in the enclosure.
- Fuse Protection: Always use fuses to protect against short circuits and overloads.
- Monitor Battery Health: Regularly check the battery voltage and state of charge to prolong its lifespan.
- Consider Expandability: Design your system with future expansion in mind. You can easily add more solar panels or batteries later on.
When to Call a Professional
- Complex Electrical Issues: If you’re uncomfortable working with electricity, consult a qualified electrician.
- Battery Damage: If the battery is damaged or leaking, handle it with care and dispose of it properly.
- Inverter Malfunctions: If the inverter is malfunctioning, contact the manufacturer or a qualified repair technician.
FAQ
Q: How much power can a homemade solar generator provide?
A: The power output depends on the size of the solar panel(s) and the capacity of the battery. A typical setup with a 100W solar panel and a 50Ah battery can provide around 500Wh of energy.
Q: What is the difference between PWM and MPPT charge controllers?
A: PWM controllers are simpler and cheaper, but less efficient. MPPT controllers are more efficient, especially in cloudy conditions, but more expensive.
Q: Can I use a regular car battery for a solar generator?
A: No, car batteries are not designed for deep cycling and will quickly degrade if used in a solar generator.
Q: How long will it take to charge the battery with a solar panel?
A: The charging time depends on the solar panel wattage, sunlight intensity, and battery capacity. A 100W solar panel can take 8-12 hours to fully charge a 50Ah battery in full sunlight.
Alternative Solutions
| Solution | Pros | Cons | Best For |
|---|---|---|---|
| Pre-Built Solar Generators | Convenient, Portable, Easy to Use | More Expensive, Limited Customization | Emergency Backup, Camping |
| Grid-Tie Solar Systems | Reduced Electricity Bills, Environmentally Friendly | Complex Installation, Requires Permits | Long-Term Energy Savings |
Enjoy Your New Solar Generator
Congratulations! You’ve successfully built your own solar generator. This system will provide you with reliable power for emergencies, outdoor adventures, or reducing your carbon footprint. Remember to regularly maintain your system and monitor its performance to ensure it continues to operate efficiently.
Have you built your own solar generator? Share your experience and any tips you’ve learned in the comments below!