

Are you excited about your new EcoFlow Delta 2 but feeling overwhelmed by the setup process? It’s understandable – a power station like this is a significant investment, and getting it running smoothly is crucial. The good news is, getting your Delta 2 up and running is surprisingly straightforward. A quick start involves simply plugging it in and letting it charge!
But this comprehensive guide will go far beyond that initial charge. We’ll walk you through everything from unboxing and initial charging, to connecting accessories, understanding the app, and optimizing performance for years to come. By the end of this article, you’ll be confident in using your EcoFlow Delta 2 to power your adventures, provide backup power, or simply reduce your reliance on the grid.
What You’ll Need for EcoFlow Delta 2 Setup
| Item | Quantity | Specifications |
|---|---|---|
| EcoFlow Delta 2 Power Station | 1 | 1024Wh Capacity, 1800W Output |
| AC Charging Cable | 1 | Standard US/EU/UK Plug (depending on region) |
| DC Charging Cable (Optional) | 1 | For car or solar charging |
| Solar Panel (Optional) | Varies | Compatible with EcoFlow Solar Panels (110W-400W) |
| EcoFlow App | 1 | Available for iOS and Android |
| Extension Cords/Power Strips (Optional) | Varies | For expanding output options |
| Bluetooth Connection | 1 | Built-in for app connectivity |
Preparation Steps and Safety Considerations
Before you begin, it’s important to choose a suitable location for your Delta 2.
- Ventilation: Ensure the area is well-ventilated. The Delta 2 generates some heat during operation and charging.
- Temperature: Keep it within the operating temperature range of 32°F to 104°F (0°C to 40°C).
- Dry Environment: Avoid exposing the Delta 2 to rain, snow, or excessive humidity. While it’s built tough, water damage isn’t covered under warranty.
- Surface: Place the Delta 2 on a stable, level surface.
- Read the Manual: Always read the EcoFlow Delta 2 user manual before operation. It contains important safety information and detailed specifications.
Step-by-Step Setup Process
Phase 1: Unboxing and Initial Inspection
- Carefully unpack the EcoFlow Delta 2 from its box.
- Inspect the unit for any visible damage. If you notice anything, contact EcoFlow support immediately.
- Verify that all included accessories are present: AC charging cable, user manual, and any regional-specific adapters.
Phase 2: Initial Charging
- Connect the AC Charging Cable: Plug the AC charging cable into the Delta 2’s AC input port and then into a standard wall outlet.
- Power On: Press the power button on the front of the unit. The screen will illuminate.
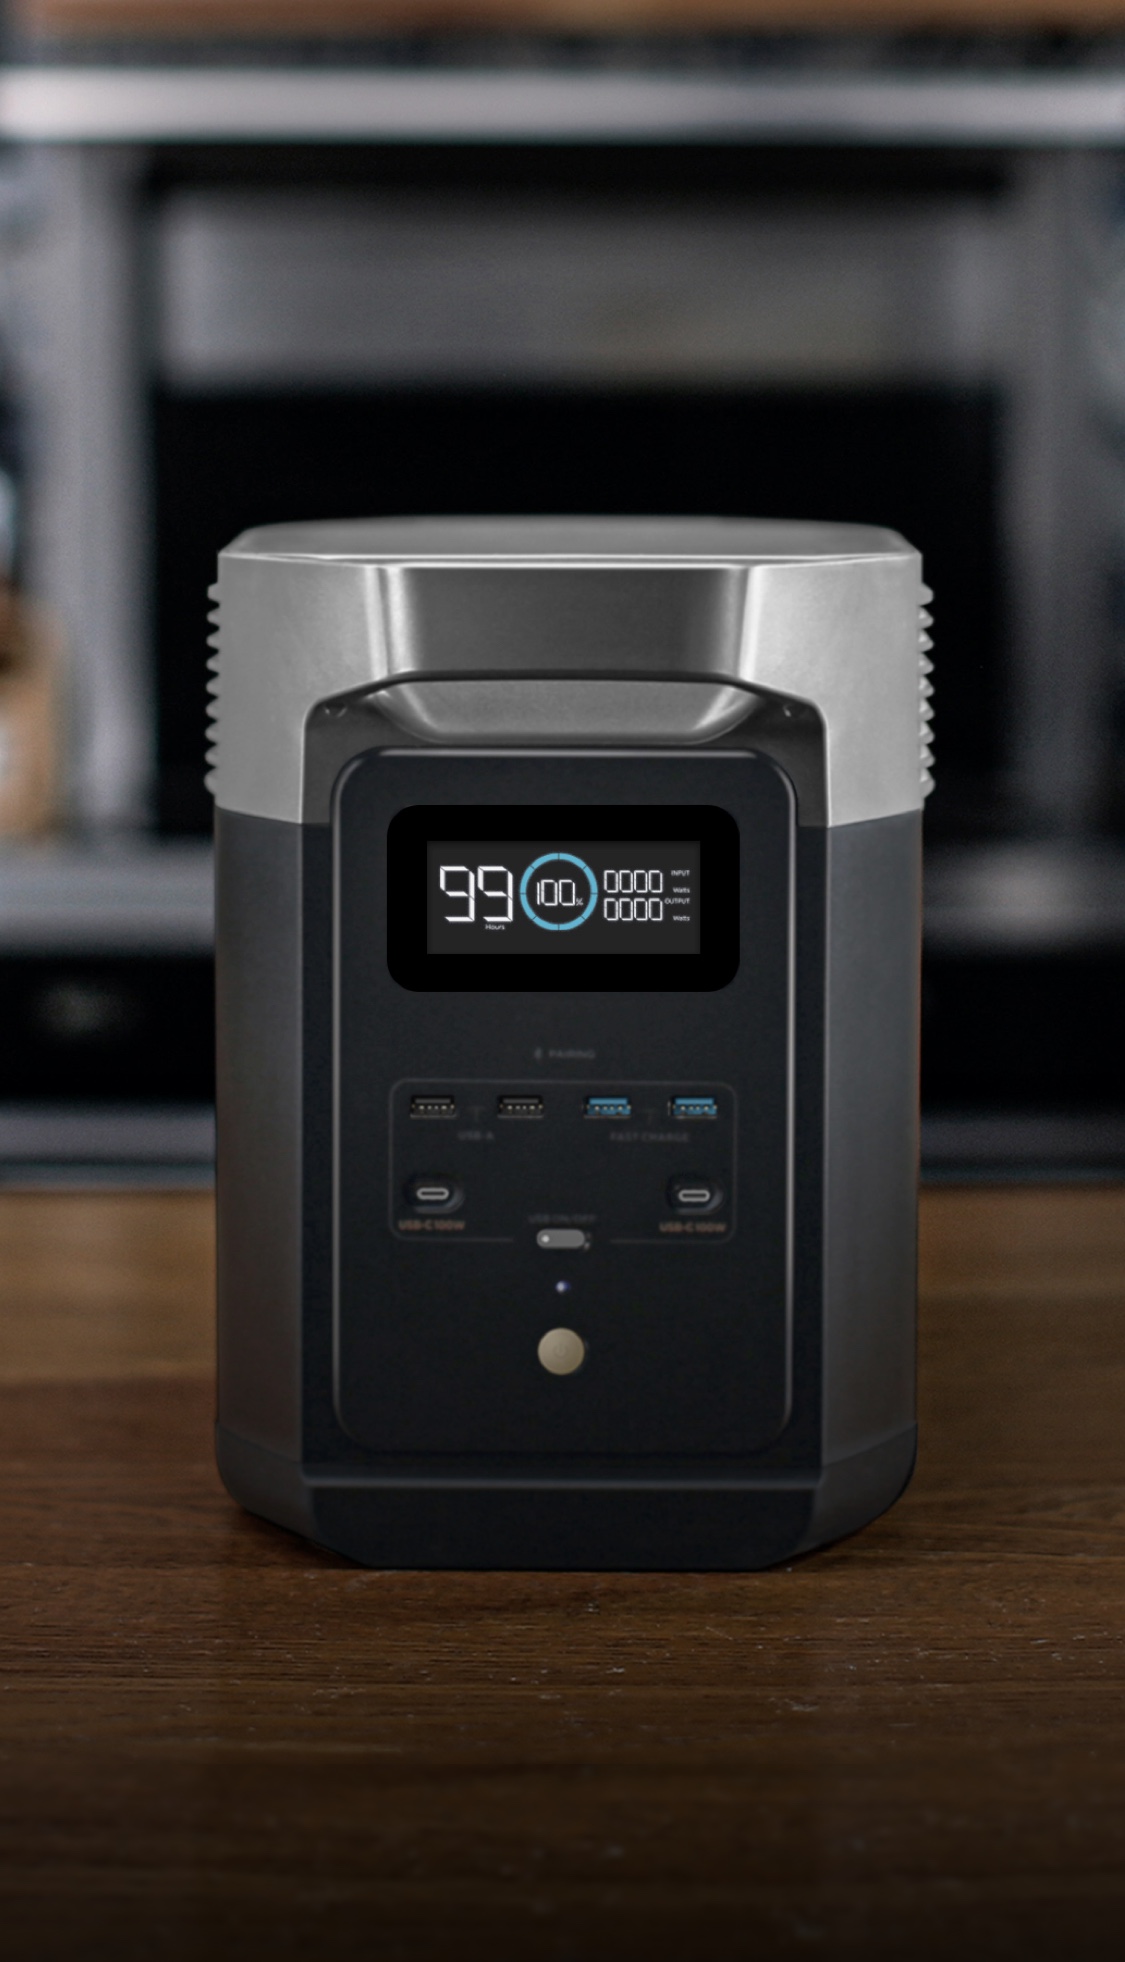
- Monitor Charging: The display will show the charging percentage and estimated time to full charge. A full charge typically takes around 1.8-2.2 hours.
- Initial Charge Recommendation: It’s recommended to fully charge the Delta 2 before its first use to calibrate the battery management system (BMS).
Phase 3: Connecting to the EcoFlow App
- Download the App: Download the EcoFlow app from the App Store (iOS) or Google Play Store (Android).
- Create an Account: Open the app and create an EcoFlow account.
- Add the Delta 2: In the app, tap the “+” button to add a new device. Select “Delta 2” from the list.
- Bluetooth Pairing: The app will guide you through the Bluetooth pairing process. Ensure Bluetooth is enabled on your smartphone.
- Wi-Fi Connection (Optional): Once paired via Bluetooth, you can connect the Delta 2 to your home Wi-Fi network for remote access and control. This allows you to monitor the battery level, control charging/discharging, and receive notifications from anywhere.
Phase 4: Understanding the Delta 2 Interface
- Display Screen: The Delta 2’s display provides key information:
- Battery Level (%)
- Input/Output Wattage
- Estimated Remaining Time
- Charging/Discharging Status
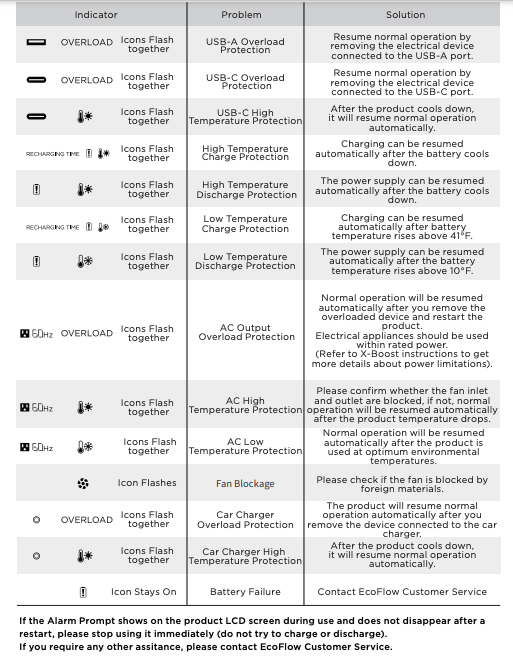
- Error Codes (if any)
- Buttons:
- Power Button: Turns the Delta 2 on/off.
- Function Button: Used to cycle through different display modes and settings.
- AC/DC Buttons: Enable/disable AC and DC outputs.
Post-Completion Testing and Troubleshooting
- Test AC Outputs: Plug a small appliance (lamp, phone charger) into one of the AC outlets to verify it’s working.
- Test USB Outputs: Connect a USB device to one of the USB ports (USB-A or USB-C) to confirm functionality.
- Test DC Outputs: If you have a DC-powered device, connect it to the DC output ports.
- Troubleshooting:
- Delta 2 won’t turn on: Ensure it’s charged and the power button is pressed firmly.
- App won’t connect: Verify Bluetooth is enabled and the Delta 2 is within range. Restart the app and try again.
- Outputs not working: Check that the corresponding AC/DC buttons are enabled. Ensure the connected device is functioning correctly.
Pro Tips for EcoFlow Delta 2 Users
- X-Boost Mode: Utilize the X-Boost mode (accessible through the app) to power devices with higher wattage requirements, although this may reduce efficiency.
- Smart Charging: Schedule charging times in the app to take advantage of off-peak electricity rates.
- Firmware Updates: Regularly check for and install firmware updates through the app. These updates often improve performance and add new features.
- Battery Health: Avoid fully discharging the Delta 2 frequently. Partial discharges are generally better for long-term battery health. Aim to keep the battery between 20% and 80% charge when possible.
- Storage: If storing the Delta 2 for extended periods, charge it to around 40-60% and store it in a cool, dry place.
Common Mistakes to Avoid
- Overloading the AC outputs.
- Exposing the Delta 2 to extreme temperatures or humidity.
- Using incompatible solar panels.
- Ignoring warning messages on the display.
Professional Help
- Signs you need professional help: The Delta 2 is physically damaged, consistently displays error codes, or fails to charge/discharge properly.
- Where to find help: Contact EcoFlow customer support through their website or app. Check their website for authorized repair centers in your area.
- Typical cost ranges: Repair costs vary depending on the issue. Expect to pay for parts and labor.
FAQ Section
Q: Can I use the EcoFlow Delta 2 while it’s charging?
A: Yes, the Delta 2 supports pass-through charging, meaning you can use it while it’s plugged in and charging.
Q: How long will the Delta 2 power a refrigerator?
A: This depends on the refrigerator’s wattage. A typical refrigerator consumes 100-200W. The Delta 2 could power it for approximately 5-10 hours.
Q: Can I connect multiple Delta 2 units together?
A: Yes, with the EcoFlow Delta 2 Extra Battery, you can significantly expand its capacity.
Q: What solar panels are compatible with the Delta 2?
A: The Delta 2 is compatible with a wide range of solar panels, including EcoFlow’s own panels and most other panels that use the MC4 connector.
Enjoy Your New EcoFlow Delta 2
Now that you’ve completed the setup process, you’re ready to enjoy the benefits of your EcoFlow Delta 2! From powering your outdoor adventures to providing peace of mind during power outages, this versatile power station will be a valuable addition to your life.
Remember to regularly check the app for updates, monitor battery health, and follow the safety guidelines outlined in the user manual.
Have you successfully set up your EcoFlow Delta 2? Share your experience and any tips you’ve discovered in the comments below!