

Building your own solar generator can seem daunting, but it’s a rewarding project offering energy independence and cost savings. Are you tired of relying on the grid, especially during power outages, or looking for a portable power source for camping and off-grid adventures? A DIY solar generator provides a reliable solution, and a simple starting point is a basic setup using readily available components.
This comprehensive guide will walk you through every step of building a DIY solar generator, from choosing the right components to assembling and testing your system. We’ll cover multiple build options, safety considerations, and troubleshooting tips, ensuring you have a fully functional and reliable power source by the end. You’ll learn how to create a system tailored to your specific needs, whether it’s powering essential appliances during an emergency or enjoying off-grid freedom.
What You’ll Need for a DIY Solar Generator
| Item | Quantity | Specifications | Estimated Cost |
|---|---|---|---|
| Solar Panels | 1-4 | 100W-300W each, 12V output | $100 – $600 |
| Deep Cycle Battery | 1-2 | 12V, 50Ah-100Ah (Lithium or AGM) | $150 – $400 |
| Charge Controller | 1 | MPPT or PWM, compatible with battery voltage & panel wattage | $50 – $200 |
| Inverter | 1 | Pure Sine Wave, wattage based on appliance needs (300W-1000W+) | $100 – $500 |
| Battery Cables | 2-4 | Red & Black, 4-10 AWG, length as needed | $20 – $50 |
| Fuse Box/Breaker | 1 | DC Fuse Box or Circuit Breaker Panel | $20 – $80 |
| Fuses/Breakers | As needed | Rated for DC voltage & current | $10 – $30 |
| Connectors | Various | MC4 connectors, ring terminals, wire connectors | $10 – $40 |
| Enclosure | 1 | Durable box or case to house components | $30 – $100 |
| Voltmeter/Ammeter (Optional) | 1 | For monitoring system performance | $20 – $50 |
| Total Estimated Cost | $410 – $1850+ |
Phase 1: Component Selection & Understanding
Before you start building, understanding each component is crucial.
Solar Panels: Wattage & Voltage
The wattage of your solar panels determines how quickly you can charge your battery. Higher wattage equals faster charging. Voltage should match your battery system (typically 12V). Consider portability; smaller panels are easier to move, while larger panels provide more power.
Deep Cycle Batteries: Lead-Acid vs. Lithium
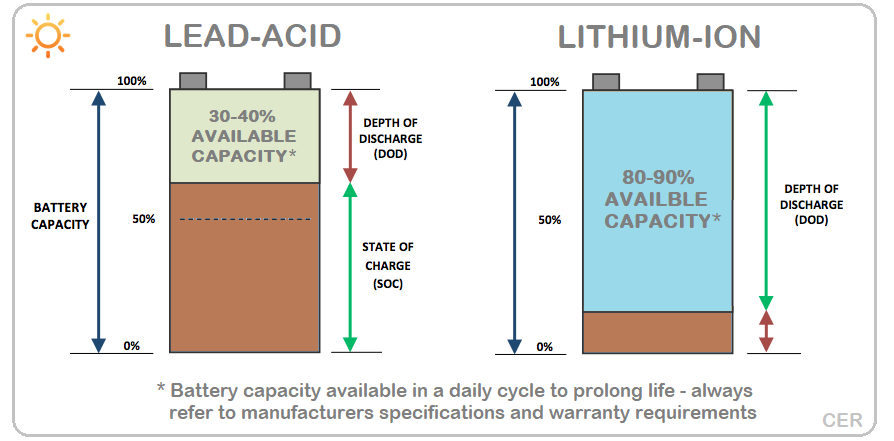
Deep cycle batteries are designed for repeated charging and discharging. AGM (Absorbent Glass Mat) lead-acid batteries are a cost-effective option, but lithium batteries offer longer lifespan, higher efficiency, and lighter weight.
Charge Controller: MPPT vs. PWM
The charge controller regulates the voltage from the solar panels to prevent overcharging the battery. MPPT (Maximum Power Point Tracking) controllers are more efficient, especially in cloudy conditions, but more expensive. PWM (Pulse Width Modulation) controllers are simpler and cheaper, suitable for smaller systems.
Inverter: Pure Sine Wave vs. Modified Sine Wave
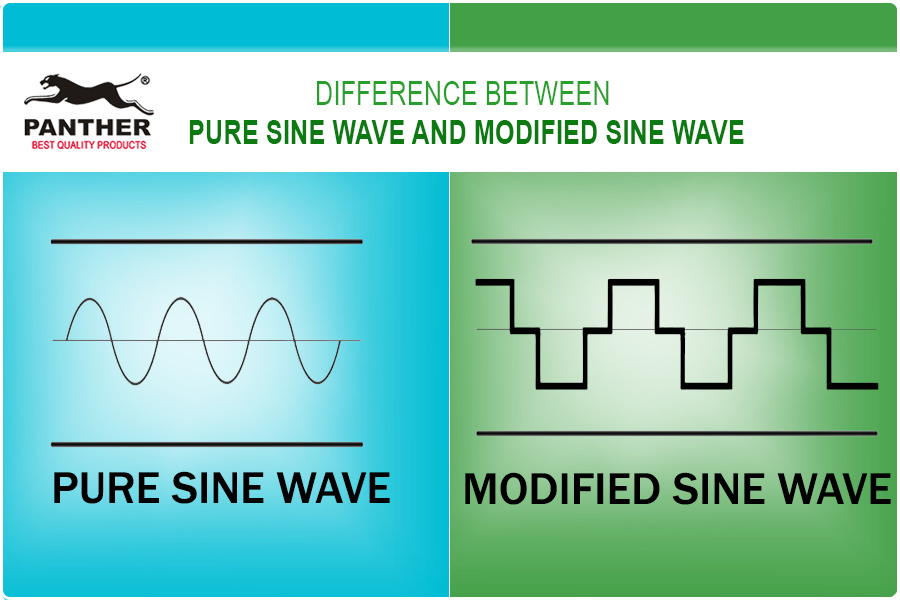
The inverter converts DC power from the battery to AC power for running standard appliances. Pure sine wave inverters provide cleaner power and are essential for sensitive electronics. Modified sine wave inverters are cheaper but can damage some devices.
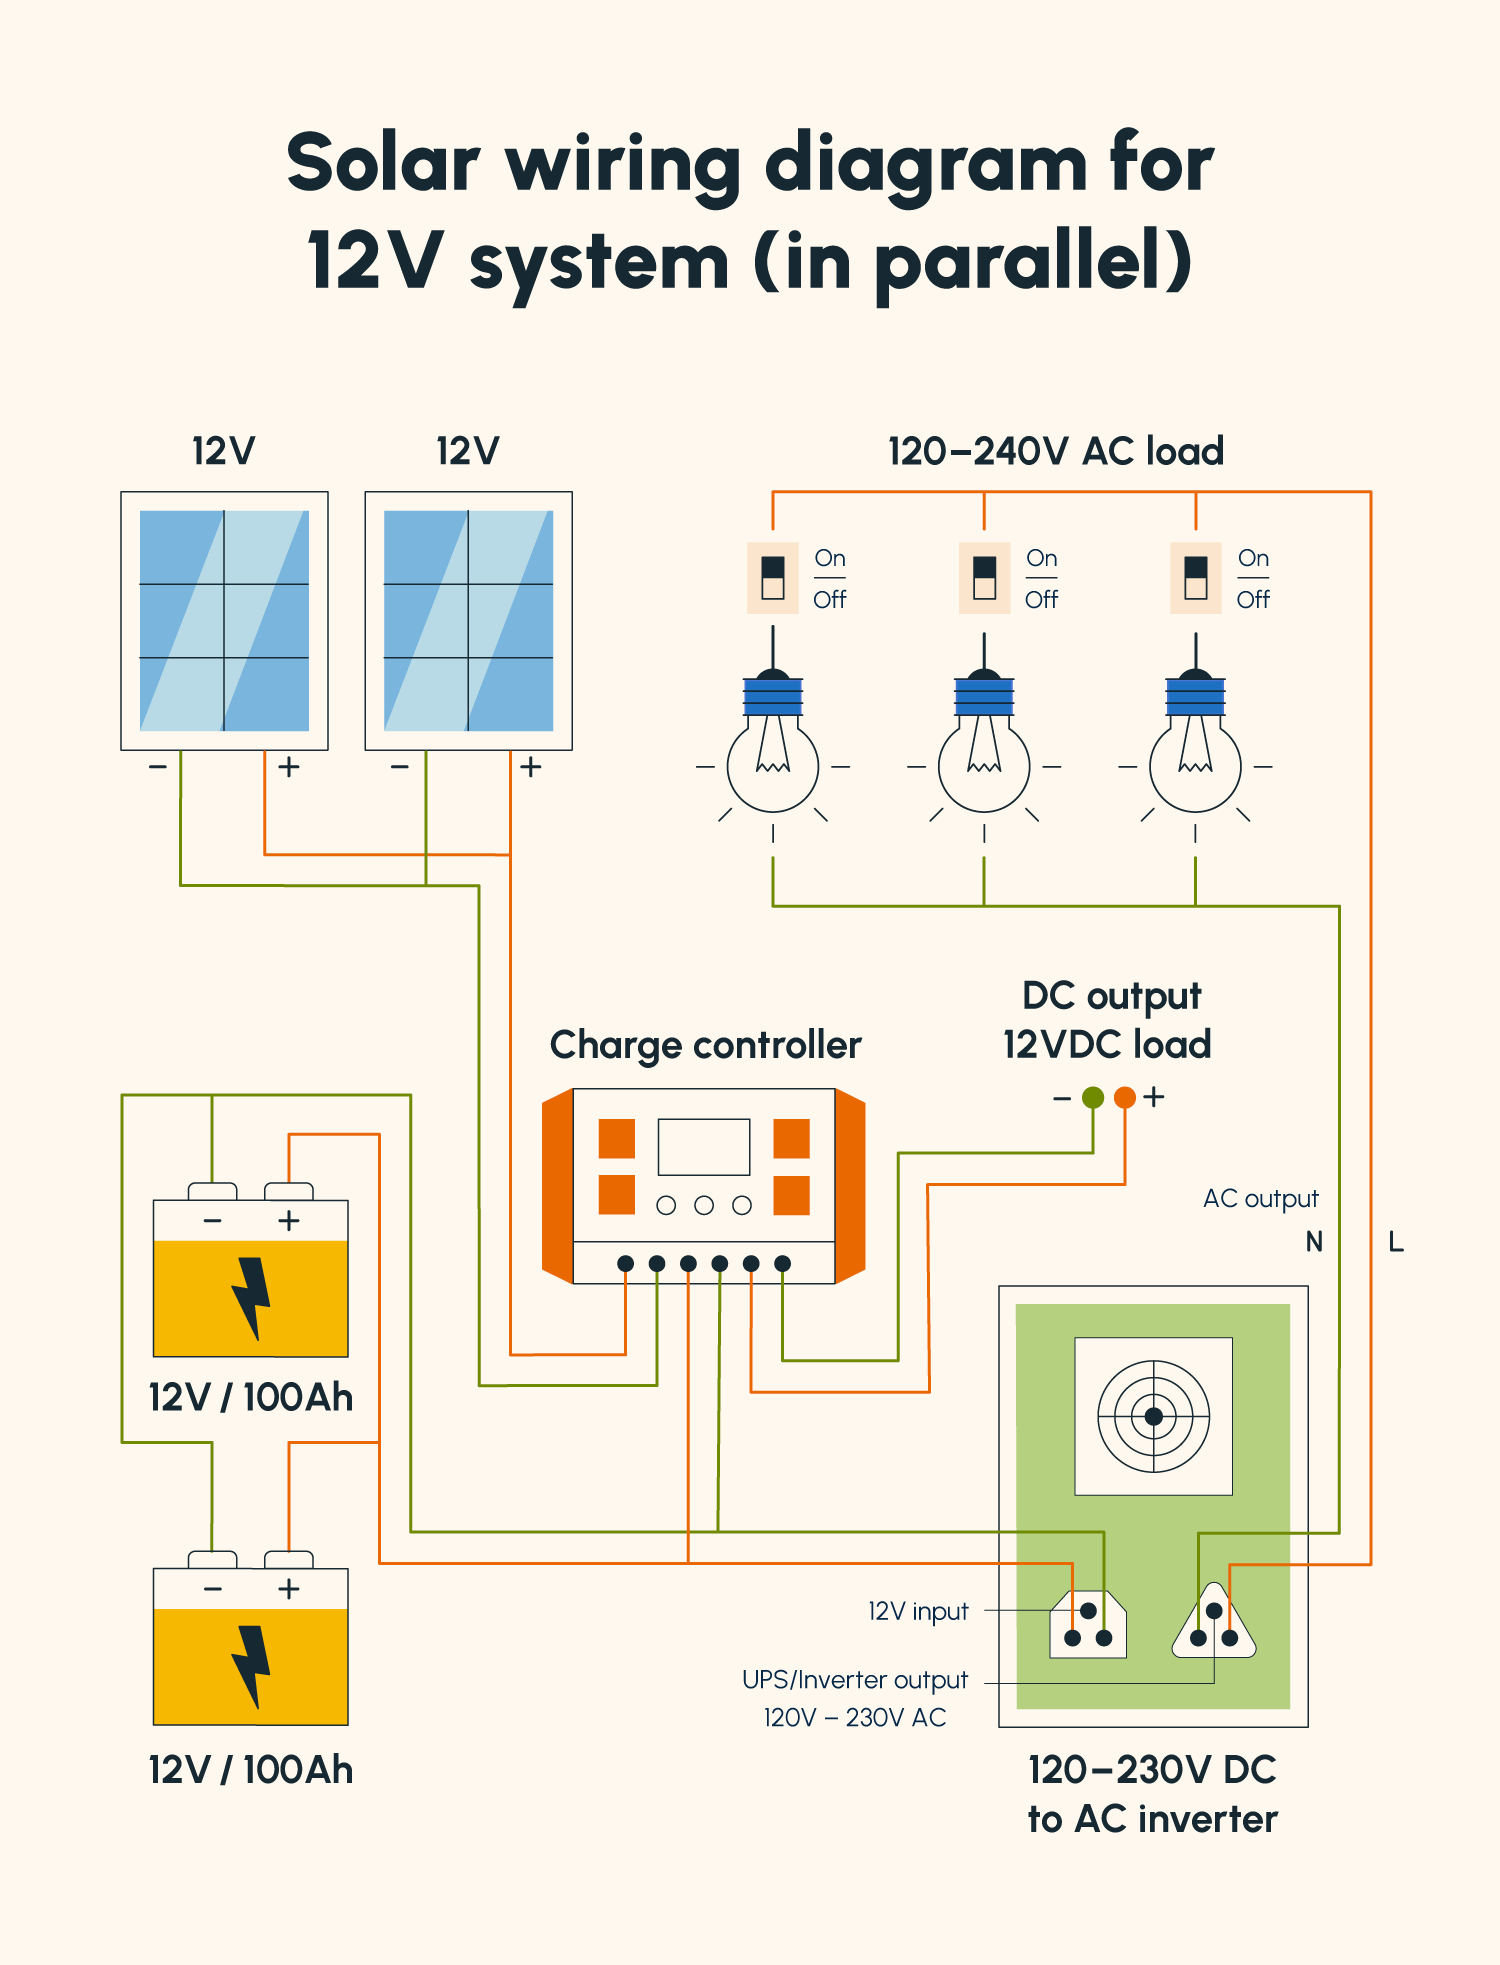
Phase 2: Assembly & Wiring
Step 1: Mounting the Components
Securely mount the charge controller, inverter, fuse box, and battery inside the enclosure. Ensure adequate ventilation to prevent overheating. Use screws, bolts, or mounting brackets to secure everything firmly.
Step 2: Connecting the Solar Panels to the Charge Controller
Connect the positive (+) and negative (-) terminals of the solar panels to the corresponding terminals on the charge controller. Use MC4 connectors for a secure and weather-resistant connection. Important: Do not connect the battery yet!
Step 3: Connecting the Charge Controller to the Battery
Connect the positive (+) and negative (-) terminals of the charge controller to the corresponding terminals on the battery. Ensure correct polarity! Install a fuse between the charge controller and the battery for safety.
Step 4: Connecting the Battery to the Inverter
Connect the positive (+) and negative (-) terminals of the battery to the corresponding terminals on the inverter. Important: Use appropriately sized battery cables and a fuse close to the battery.
Step 5: Wiring the Fuse Box/Breaker
Connect the battery to the fuse box/breaker panel. Then, connect the inverter and any other DC loads to the fuse box, using appropriately sized fuses or breakers.
Phase 3: Testing & Safety
Testing the System
- Verify Polarity: Double-check all connections for correct polarity before turning on the system.
- Monitor Voltage: Use a voltmeter to monitor the battery voltage and charge controller output.
- Load Test: Connect a small appliance (e.g., a light bulb) to the inverter and verify it powers on. Gradually increase the load to test the inverter’s capacity.
- Charge Test: Expose the solar panels to sunlight and monitor the battery voltage to ensure it is charging.
Safety Precautions
- Always disconnect the solar panels before working on the wiring.
- Use appropriately sized fuses and breakers to protect against overcurrent.
- Ensure adequate ventilation to prevent overheating.
- Avoid short circuits.
- Wear safety glasses and gloves.
- If you are uncomfortable working with electricity, consult a qualified electrician.
Pro Tips for a Successful Build
- Use a battery monitor: A battery monitor provides detailed information about battery voltage, current, and state of charge.
- Invest in quality cables and connectors: This will ensure a reliable and long-lasting connection.
- Consider a remote display: A remote display allows you to monitor the system’s performance from a distance.
- Properly ventilate the enclosure: Overheating can significantly reduce battery life and inverter efficiency.
- Plan for expansion: Choose components that can be easily upgraded or expanded in the future.
- Label everything clearly: This will make troubleshooting much easier.
When to Call a Professional
- If you are unsure about any aspect of the electrical wiring.
- If you experience persistent problems with the system.
- If you suspect a safety hazard.
- If you require a system that exceeds your skill level.
FAQ
Q: What size battery do I need?
A: Battery size depends on your power consumption. Calculate your total energy needs in watt-hours (Wh) and divide by the battery voltage (12V) to determine the required battery capacity in amp-hours (Ah).
Q: Can I use multiple solar panels?
A: Yes, you can connect multiple solar panels in parallel to increase current or in series to increase voltage. Ensure the charge controller can handle the combined wattage and voltage.
Q: What is the difference between MPPT and PWM charge controllers?
A: MPPT controllers are more efficient at converting solar energy to battery power, especially in low-light conditions. PWM controllers are simpler and cheaper but less efficient.
Q: How long will my solar generator run on a full charge?
A: Run time depends on the battery capacity, inverter efficiency, and the power consumption of the appliances connected to the inverter.
Alternative Solutions
If building a DIY solar generator feels too complex, consider purchasing a pre-built portable power station. These units offer similar functionality but require no assembly.
| Solution | Pros | Cons | Best For |
|---|---|---|---|
| DIY Solar Generator | Cost-effective, customizable, educational | Requires technical skills, time-consuming | Hobbyists, off-grid enthusiasts |
| Portable Power Station | Convenient, ready-to-use, safe | More expensive, limited customization | Emergency backup, camping, occasional use |
Enjoy Your New Solar Generator
Congratulations, you’ve successfully built your own solar generator! Now you can enjoy the benefits of clean, renewable energy and the peace of mind that comes with energy independence. Remember to regularly monitor and maintain your system to ensure optimal performance and longevity.
Share your DIY solar generator project in the comments below! What appliances are you planning to power with your new system?