
Are you struggling to get your Ecoflow Wave 2 portable heater up and running? It can be frustrating when you’re trying to stay warm and the heater isn’t cooperating. A simple power connection and initial setup are usually all it takes, but sometimes things aren’t that straightforward. This guide will walk you through everything you need to know to get your Wave 2 heater working quickly and safely.
This comprehensive guide will go beyond the basic power-on instructions. We’ll cover everything from unpacking and initial setup to connecting to power sources, understanding the control panel, troubleshooting common issues, and even optimizing performance for maximum warmth. By the end of this article, you’ll not only have your Ecoflow Wave 2 heater working perfectly, but you’ll also understand how to maintain it for years of reliable use.
Unboxing and Initial Inspection
Before you begin setting up your Ecoflow Wave 2, a thorough inspection is crucial.
- What’s in the Box?
- Ecoflow Wave 2 Heater unit
- Power Cable
- User Manual
- Inspection Checklist:
- Visual Damage: Check for any visible cracks, dents, or other damage to the heater unit or power cable. Do not use the heater if damage is present. Contact Ecoflow support immediately.
- Component Verification: Ensure all listed components are present.
- Power Cable Integrity: Examine the power cable for cuts, fraying, or exposed wires.
Connecting to a Power Source

The Ecoflow Wave 2 is versatile, allowing connection to various power sources.
Power Source Options
- AC Wall Outlet: The most common and reliable power source.
- Ecoflow PowerStation: Connect directly to a compatible Ecoflow PowerStation for off-grid heating. (Requires appropriate AC output from the PowerStation)
- Car Charger (with adapter): Can be used with a compatible car charger and adapter (sold separately).
Connection Steps
- AC Wall Outlet: Plug the power cable into a grounded AC wall outlet (120V/60Hz). Connect the other end to the heater’s power input port.
- Ecoflow PowerStation: Connect the power cable to the AC outlet on your Ecoflow PowerStation. Ensure the PowerStation is turned on and has sufficient charge.
- Car Charger: Use a compatible car charger with an AC adapter. Connect the adapter to the heater’s power input port and plug the charger into your vehicle’s cigarette lighter socket.
Important: Always ensure the power source is compatible with the Ecoflow Wave 2’s power requirements. Using an incompatible power source can damage the heater.
Understanding the Control Panel

The control panel is your command center for operating the Wave 2.
- Power Button: Turns the heater on and off.
- Temperature Control: Adjusts the desired heating temperature. (Displayed in Fahrenheit or Celsius, adjustable in settings)
- Fan Speed: Selects the fan speed (Low, Medium, High, Auto).
- Mode Selection:
- Eco Mode: Automatically adjusts power to maintain a comfortable temperature, saving energy.
- Quick Heat Mode: Maximizes heating output for fast warm-up.
- Sleep Mode: Gradually lowers the temperature for comfortable sleeping.
- Timer: Sets a timer for automatic shut-off.
- Display Screen: Shows current temperature, set temperature, fan speed, and mode.
Step-by-Step Setup Process
Now, let’s put it all together and get your heater running.
Phase 1: Initial Power-Up
- Connect Power: Connect the Ecoflow Wave 2 to your chosen power source.
- Power On: Press the Power button. The display screen should illuminate.
- Initial Settings: The heater may prompt you to select your preferred temperature unit (Fahrenheit or Celsius). Follow the on-screen instructions.
Phase 2: Setting the Temperature & Mode
- Set Temperature: Use the Temperature Control buttons to set your desired heating temperature.
- Select Mode: Choose your preferred operating mode (Eco, Quick Heat, or Sleep) using the Mode Selection button.
- Adjust Fan Speed: Adjust the fan speed to your comfort level. Auto mode adjusts fan speed based on temperature.
Phase 3: Utilizing the Timer
- Access Timer: Press the Timer button.
- Set Duration: Use the Temperature Control buttons to set the desired shut-off time (in hours).
- Confirm Timer: Press the Timer button again to confirm the setting.
Troubleshooting Common Issues
Even with a straightforward setup, you might encounter some issues.
Issue 1: Heater Won’t Turn On
- Check Power Connection: Ensure the power cable is securely plugged into both the heater and the power source.
- Test Outlet: Verify the power outlet is working by plugging in another device.
- PowerStation Output: If using a PowerStation, ensure it’s turned on and has sufficient charge.
Issue 2: Not Heating Properly
- Temperature Setting: Verify the temperature is set higher than the current room temperature.
- Fan Speed: Ensure the fan is running at a sufficient speed to distribute heat.
- Air Filter: A dirty air filter can restrict airflow. See the “Maintenance & Cleaning” section.
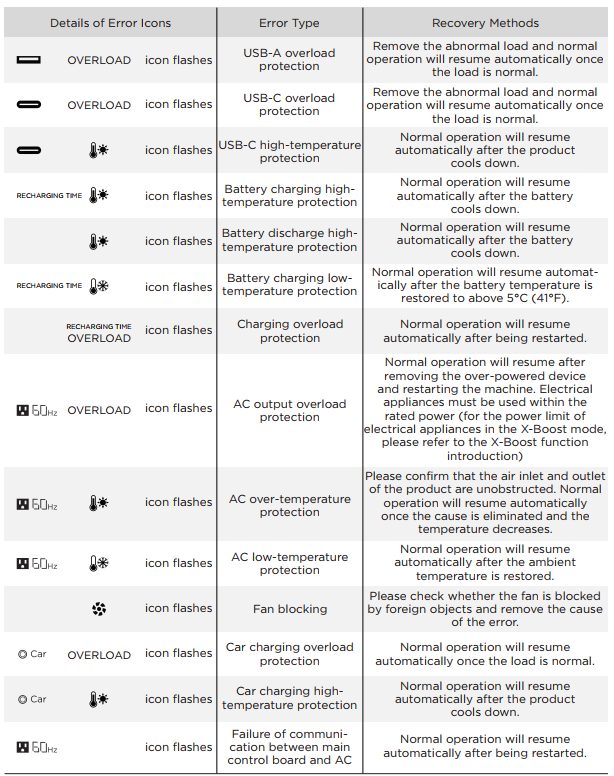
Issue 3: Error Code on Display
- Consult Manual: Refer to the Ecoflow Wave 2 user manual for a list of error codes and their corresponding solutions.
- Ecoflow Support: Contact Ecoflow support if you can’t resolve the error code yourself.
Pro Tips
- Optimize Placement: Position the heater in a central location for even heat distribution. Avoid placing it near flammable materials.
- Eco Mode Efficiency: Utilize Eco Mode for energy savings while maintaining a comfortable temperature.
- Remote Control: Consider purchasing the Ecoflow remote control (sold separately) for convenient operation.
- PowerStation Pairing: Pair with a larger Ecoflow PowerStation for extended runtimes during power outages.
- Regular Software Updates: Keep the heater’s firmware updated for optimal performance and new features. Check the Ecoflow app for updates.
Professional Help
- When to Seek Professional Assistance: If you experience persistent issues, electrical problems, or suspect a faulty component, contact Ecoflow support or a qualified appliance repair technician.
- Warranty Information: Review your warranty documentation for coverage details.
- Typical Repair Costs: Repair costs vary depending on the issue. Expect to pay for labor and replacement parts.
FAQ
Q: Can I use an extension cord with the Ecoflow Wave 2?
A: It is not recommended to use an extension cord. If an extension cord is absolutely necessary, use a heavy-duty cord rated for at least 15 amps.
Q: How do I clean the air filter?
A: The air filter is located on the back of the heater. Remove the filter and vacuum it to remove dust and debris. Replace the filter if it’s heavily soiled.
Q: What is the BTU output of the Ecoflow Wave 2?
A: The Ecoflow Wave 2 produces up to 900W of heating power, which is approximately 3067 BTU.
Q: Can I control the Ecoflow Wave 2 with my smartphone?
A: No, the Ecoflow Wave 2 does not have built-in Wi-Fi connectivity for smartphone control.
Get Your Ecoflow Wave 2 Working Again
By following this guide, you should now have your Ecoflow Wave 2 heater set up and running smoothly. Remember to prioritize safety, inspect your components, and utilize the troubleshooting tips if you encounter any issues.
Did this guide help you get your Ecoflow Wave 2 working? Share your experience or any questions you have in the comments below!