
Are you frustrated with constantly plugging and unplugging your Renogy One Core portable power station? Hardwiring it directly to your vehicle’s electrical system or a dedicated power source can provide a seamless, always-on charging experience. This guide will walk you through the process, offering a quick fix for basic connectivity and a comprehensive step-by-step plan for a permanent hardwire installation.
This comprehensive guide goes beyond a simple connection. We’ll cover everything from understanding the electrical requirements and selecting the right components to the detailed hardwiring process, safety precautions, and troubleshooting tips. By the end of this article, you’ll have the knowledge and confidence to hardwire your Renogy One Core and enjoy uninterrupted power wherever you go.
Understanding Renogy One Core Hardwiring
Before diving into the installation, it’s crucial to understand the basics. The Renogy One Core accepts DC input ranging from 12V to 24V. Hardwiring involves connecting the One Core directly to a 12V or 24V DC power source, bypassing the need for the included AC adapter.
Common Causes of Wanting to Hardwire
- Convenience: Eliminates the need to plug/unplug the unit.
- Always-On Charging: Keeps the One Core topped up while driving or connected to a dedicated power source.
- Remote Locations: Ideal for off-grid setups where AC power isn’t available.
- Vehicle Integration: Seamlessly integrates the One Core into your vehicle’s power system.
How to Hardwire Renogy One Core: A Step-by-Step Guide
This section details a typical hardwire installation to a 12V DC power source, such as a vehicle’s electrical system. Always disconnect the negative terminal of your power source before starting any electrical work!
Materials and Tools Needed
| Item | Quantity | Specifications |
|---|---|---|
| 12V DC Fuse Holder & Fuse | 1 | Rated for at least 30A (check your One Core’s manual for the exact amperage) |
| 12 AWG or 10 AWG Wire | Length varies | Stranded copper wire, sufficient length for the run |
| Ring Terminals | 2 | To connect to battery/power source |
| Inline Switch (Optional) | 1 | For easy on/off control |
| Wire Strippers/Crimpers | 1 | For preparing and connecting wires |
| Multimeter | 1 | For testing voltage and continuity |
| Screwdrivers | Assorted | To access battery/power source |
| Electrical Tape | 1 Roll | For insulation |
| Heat Shrink Tubing (Optional) | Assorted | For a more professional and durable connection |
| DC Voltmeter/Tester | 1 | To verify proper operation |
Phase 1: Preparation
Safety Setup
- Disconnect Power: Crucially, disconnect the negative terminal of your 12V power source (battery) before beginning.
- Work Area: Choose a well-lit and dry workspace.
- Personal Protection: Wear safety glasses.
Tool Preparation
- Gather all necessary tools and materials.
- Ensure your wire strippers and crimpers are in good working order.
Wire Length Calculation
- Measure the distance between your power source and the Renogy One Core’s DC input.
- Add extra length (at least 2-3 feet) for routing and connections.
Phase 2: Wiring the Connection

Step 1: Preparing the Wires
- Cut two lengths of 12 AWG or 10 AWG wire to the calculated length.
- Strip approximately 1/2 inch of insulation from both ends of each wire.
Step 2: Attaching Ring Terminals
- Crimp ring terminals onto one end of each wire, ensuring a secure connection. These will connect to your power source.
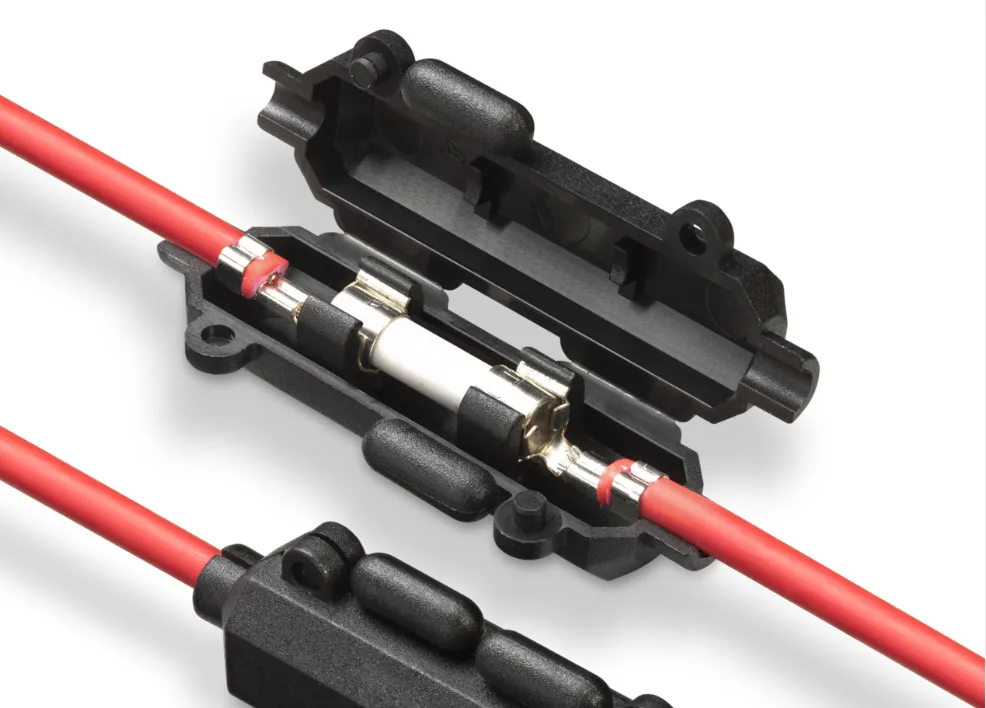
Step 3: Installing the Fuse Holder
- Cut one of the wires in half.
- Attach the cut ends to the fuse holder. Ensure the fuse holder is oriented correctly, allowing for easy fuse replacement.
- Insert the appropriate amperage fuse (as specified in the Renogy One Core manual).
Step 4: Connecting to the Power Source
- Connect the ring terminals to the positive and negative terminals of your 12V power source. Ensure correct polarity! Positive to positive, negative to negative.
- If using an inline switch, connect it to either the positive or negative wire before connecting to the One Core.
Step 5: Connecting to the Renogy One Core
- Connect the remaining wires to the Renogy One Core’s DC input terminals. Again, double-check polarity! Positive to positive, negative to negative.
Phase 3: Testing and Securing
Step 1: Reconnect Power
- Carefully reconnect the negative terminal of your 12V power source.
Step 2: Verify Voltage
- Use a multimeter to verify that the voltage at the Renogy One Core’s DC input is within the acceptable range (12V-24V).
Step 3: Test Charging
- Observe if the Renogy One Core begins charging. The charging indicator should illuminate.
Step 4: Secure Wiring
- Neatly route and secure all wiring to prevent damage or shorts. Use zip ties or cable clamps to keep wires organized.
Pro Tips for Hardwiring Your Renogy One Core
- Fuse Selection: Always use a fuse rated slightly higher than the Renogy One Core’s maximum input current. Check your manual.
- Wire Gauge: Using a thicker gauge wire (e.g., 10 AWG) reduces voltage drop over longer distances.
- Polarity: Double-check and triple-check the polarity before making any connections. Incorrect polarity can damage the One Core.
- Connections: Ensure all connections are tight and secure to prevent overheating or shorts.
- Strain Relief: Provide strain relief for the wires at both the power source and the One Core to prevent them from being pulled or damaged.
- Heat Shrink: Use heat shrink tubing over exposed connections for added insulation and durability.
Professional Help
When to Seek Professional Assistance
- Unfamiliarity with Electrical Wiring: If you are uncomfortable working with electrical systems, it’s best to hire a qualified electrician.
- Complex Vehicle Systems: If your vehicle has a complex electrical system, a professional can ensure a safe and proper installation.
- Troubleshooting Difficulties: If you encounter problems during the installation, a professional can diagnose and resolve them.
Finding a Qualified Electrician
- Search online for “automotive electrician” or “DC power system installer.”
- Ask for recommendations from friends or family.
- Get quotes from multiple installers before making a decision.
FAQ
Q: What fuse amperage should I use?
A: Refer to your Renogy One Core manual. Typically, a 30A fuse is sufficient, but always verify the specific requirement.
Q: Can I hardwire the One Core to a 24V system?
A: Yes, the One Core accepts both 12V and 24V DC input. Ensure your fuse and wiring are appropriately rated for 24V.
Q: Will hardwiring void the warranty?
A: Modifying the unit may void the warranty. Check the warranty terms and conditions.
Q: What if the One Core doesn’t charge after hardwiring?
A: Double-check the polarity, fuse, and voltage at the DC input. Ensure all connections are secure.
Get Your Renogy One Core Working Again
By following these steps, you’ve successfully hardwired your Renogy One Core, unlocking a new level of convenience and power. Remember to prioritize safety and double-check all connections.
- Seamless, always-on charging
- Simplified power setup
- Increased convenience for off-grid adventures
Share your hardwiring experience and any helpful tips in the comments below! Have you encountered any challenges? Let us know, and we’ll do our best to help.