
Are you ready to harness the power of the sun but feeling overwhelmed by the wiring process? Getting your Renogy solar panels connected correctly is crucial for optimal performance and safety. A simple parallel connection can often get you started, but understanding series vs. parallel configurations, proper fusing, and charge controller compatibility is vital. This guide will walk you through everything you need to know.
This comprehensive guide will cover everything from understanding the different wiring configurations to safely connecting your Renogy panels to a charge controller and battery bank. We’ll explore series and parallel wiring, proper fusing techniques, and essential safety precautions, ensuring you can confidently install your solar system and start enjoying clean, renewable energy. By the end of this article, you’ll have a solid understanding of how to wire your Renogy solar panels correctly and efficiently.
Understanding Solar Panel Wiring Configurations
Before diving into the wiring process, it’s important to understand the two primary configurations: series and parallel. Each configuration affects voltage and amperage, impacting your system’s overall performance.
Series Wiring
Series wiring involves connecting the positive terminal of one panel to the negative terminal of the next. This increases the voltage while keeping the amperage the same. This is useful for reaching the minimum voltage required by your charge controller.
- Voltage Increase: Total voltage = Voltage of one panel x Number of panels
- Amperage Remains Constant: Amperage remains the same as a single panel.
- Use Case: Ideal when your charge controller requires a higher voltage input.
Parallel Wiring
Parallel wiring involves connecting all the positive terminals together and all the negative terminals together. This increases the amperage while keeping the voltage the same. This configuration is useful for maximizing current, especially in situations with shading or less-than-ideal sunlight.
- Voltage Remains Constant: Voltage remains the same as a single panel.
- Amperage Increase: Total amperage = Amperage of one panel x Number of panels.
- Use Case: Ideal for increasing current to charge batteries faster or run larger loads.
Materials and Tools Needed
| Item | Quantity | Specifications |
|---|---|---|
| Renogy Solar Panels | Varies | Based on your power needs |
| Solar Cable (MC4 Connectors) | Sufficient length | 10-12 AWG, UV-resistant |
| MC4 Connectors (if needed) | As needed | Compatible with your cable |
| Fuses & Fuse Holders | As needed | Sized appropriately for your system (see section below) |
| Wire Strippers/Crimpers | 1 | For preparing and connecting wires |
| Multimeter | 1 | For testing voltage and current |
| Wrench Set | 1 | For tightening connections |
| Safety Glasses | 1 | For eye protection |
| Gloves | 1 Pair | Insulated, for electrical safety |
| Charge Controller | 1 | Compatible with your panel configuration and battery type |
Step-by-Step Wiring Process
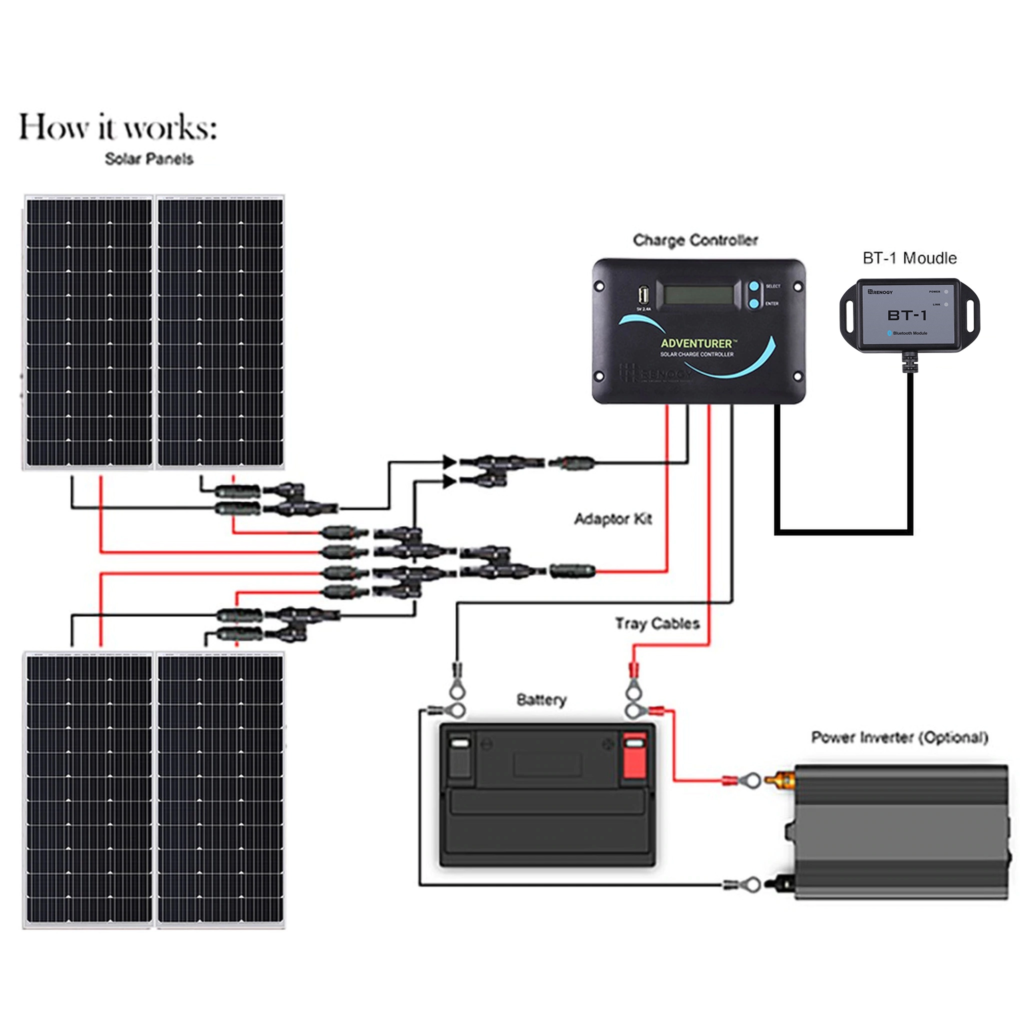
This guide focuses on a typical off-grid system with a charge controller and battery bank.
Phase 1: Preparation & Safety Setup
- Safety First: Disconnect all power sources. Wear safety glasses and insulated gloves. Work in a dry environment.
- Panel Placement: Position your Renogy solar panels in a location with optimal sunlight exposure. Ensure they are securely mounted.
- Cable Routing: Plan the cable route from the panels to the charge controller and then to the battery bank. Minimize cable length to reduce voltage drop.
Phase 2: Wiring the Panels
- Determine Configuration: Decide whether to wire your panels in series, parallel, or a combination of both based on your system’s voltage and amperage requirements.
- Connect MC4 Connectors: Attach MC4 connectors to the solar cables if they aren’t pre-installed. Ensure a secure, watertight connection.
- Series Connection (Example): Connect the positive (+) terminal of Panel 1 to the negative (-) terminal of Panel 2. Repeat for additional panels. The remaining positive and negative wires will be your output.
- Parallel Connection (Example): Connect all positive (+) wires together and all negative (-) wires together using MC4 connectors or a junction box.
- Double-Check: Verify all connections are secure and properly polarity is correct before proceeding.
Phase 3: Connecting to the Charge Controller
- Fusing: Crucially important! Install a fuse holder with a correctly sized fuse on the positive (+) wire before it connects to the charge controller. The fuse rating should be 125% of the maximum short-circuit current (Isc) of your solar array. (Isc is listed on the panel’s specification label).
- Connect to Charge Controller: Connect the positive (+) and negative (-) wires from the solar array to the corresponding terminals on the charge controller, following the manufacturer’s instructions.
- Battery Connection: Connect the charge controller to the battery bank, again ensuring correct polarity and using appropriate fusing on the positive (+) wire near the battery.
Phase 4: Testing and Verification
- Voltage Check: Use a multimeter to measure the voltage at the charge controller’s input terminals. Verify it matches your expected voltage based on your wiring configuration.
- Current Check: Measure the current at the charge controller’s input terminals. Verify it matches your expected current.
- Charge Controller Operation: Observe the charge controller’s display to confirm it’s receiving power from the solar panels and charging the battery.
Pro Tips

- Voltage Drop: Longer cable runs can lead to voltage drop. Use thicker gauge wire (lower AWG number) for longer distances.
- MC4 Crimping: Invest in a high-quality MC4 crimping tool for reliable connections. Poorly crimped connectors can cause resistance and overheating.
- Shading: Even partial shading on one panel can significantly reduce the output of an entire series string. Consider using micro-inverters or optimizers for systems prone to shading.
- Grounding: Properly ground your solar panel frames to prevent electrical shock.
- Wire Management: Securely route and support the cables to prevent damage and ensure a neat installation.
- Consider a Combiner Box: For larger arrays, a combiner box simplifies wiring and adds overcurrent protection.
Professional Help
- Signs you need a professional: If you are uncomfortable working with electricity, if you have a complex system, or if you encounter persistent problems, consult a qualified solar installer.
- What to look for: Look for installers with NABCEP certification and a proven track record.
- Typical costs: Installation costs vary depending on system size and complexity, but typically range from $3 to $5 per watt.
- Warranty considerations: Ensure the installer provides a warranty on their workmanship.
FAQ
Q: What size fuse should I use?
A: The fuse should be rated at 125% of the maximum short-circuit current (Isc) of your solar array. Check the specifications label on your panels to find the Isc value.
Q: Can I mix and match Renogy solar panels with different voltages?
A: Generally, no. Mixing panels with different voltages in series can damage the panels or charge controller. Panels with the same voltage are best.
Q: What is a charge controller and why do I need one?
A: A charge controller regulates the voltage and current from the solar panels to prevent overcharging your batteries, which can damage them.
Q: What does PWM vs. MPPT mean for charge controllers?
A: PWM (Pulse Width Modulation) is a simpler, less efficient type of charge controller. MPPT (Maximum Power Point Tracking) is more efficient and can extract more power from your panels, especially in suboptimal conditions.
Enjoy Your New Solar System!
By following these steps, you’ve successfully wired your Renogy solar panels and are now ready to enjoy the benefits of clean, renewable energy. Remember to regularly inspect your system for any signs of damage or wear.
- Understand series vs. parallel wiring configurations.
- Prioritize safety by using proper fusing and grounding techniques.
- Double-check all connections before powering up the system.
Are you ready to start powering your life with the sun? Share your solar panel wiring experience in the comments below!