

Are you frustrated with getting the most out of your Renogy AGM batteries? Incorrect settings can significantly reduce their lifespan and performance. A quick fix often involves simply ensuring your charge controller is set to the correct AGM profile, but maximizing your battery investment requires a comprehensive understanding of the optimal settings.
This guide will walk you through everything you need to know about Renogy AGM battery settings – from understanding the importance of proper configuration to detailed instructions for setting up your charge controller and inverter. We’ll cover common mistakes, troubleshooting tips, and how to optimize your system for peak performance and longevity, ensuring you get the most out of your Renogy AGM batteries.
Understanding Renogy AGM Battery Settings
AGM (Absorbent Glass Mat) batteries require specific charging parameters to prevent damage and maximize their lifespan. Unlike flooded lead-acid batteries, AGMs are sealed and don’t require topping off with water. They also have lower internal resistance, meaning they charge faster and more efficiently. Incorrect settings can lead to undercharging, overcharging, sulfation, and premature failure. Here’s a breakdown of the key settings:
Bulk Charge Voltage
This is the initial, high-voltage stage where the battery receives the majority of its charge. For most 12V Renogy AGM batteries, the bulk charge voltage should be around 14.4V – 14.8V.
Absorption Voltage
Once the battery reaches the bulk stage, it transitions to absorption. This stage maintains a constant voltage (typically 13.5V – 14.4V) while the current gradually decreases. It ensures the battery is fully charged.
Float Voltage
After absorption, the battery enters the float stage, where the voltage is reduced to a maintenance level (13.2V – 13.8V). This prevents overcharging and keeps the battery topped off.
Equalization Voltage
This is a higher voltage stage (typically 14.8V – 15.5V) used periodically to break up sulfation and balance the cells within the battery. Not all charge controllers offer equalization for AGM batteries, and it’s generally not recommended for frequent use. Check your Renogy battery specifications.
Setting Up Your Renogy Charge Controller
The charge controller is the brain of your system, responsible for regulating the voltage and current flowing to your batteries. Here’s how to configure it for optimal AGM battery performance. These instructions are general; consult your specific Renogy charge controller manual for precise details.
Method 1: Renogy Rover Series Charge Controllers
Diagnosing the Issue
Ensure your charge controller model supports AGM charging. Most Renogy Rover series controllers do, but older models may only support flooded lead-acid.
Fix Steps
- Access Settings: Press the “Menu” or “Set” button on the charge controller to enter the settings menu.
- Battery Type Selection: Navigate to the “Battery Type” or “Battery Setting” option. Select “AGM” from the available options.
- Voltage Configuration: Navigate to the “Voltage Settings” or similar option.
- Set Bulk Voltage: Set the Bulk Voltage to 14.4V – 14.8V.
- Set Absorption Voltage: Set the Absorption Voltage to 13.5V – 14.4V.
- Set Float Voltage: Set the Float Voltage to 13.2V – 13.8V.
- Equalization (Optional): If your controller has an equalization setting and your battery specifications allow it, set it to 14.8V – 15.5V and schedule it for infrequent use (e.g., once every 3-6 months).
- Save Settings: Save your changes and exit the settings menu.
Testing
Monitor the battery voltage during charging using a multimeter. Verify that the voltage stays within the specified ranges for each charging stage.
Method 2: Renogy MPPT Charge Controllers
The process is similar to the Rover series, but the menu navigation may differ.
Diagnosing the Issue
Confirm compatibility with AGM batteries.
Fix Steps
- Enter Programming Mode: Typically, this involves holding down specific buttons simultaneously (refer to your manual).
- Select Battery Type: Choose “AGM” from the battery type options.
- Customize Voltage Parameters: MPPT controllers often allow for more granular customization of voltage settings. Adjust Bulk, Absorption, and Float voltages as described above.
- Save and Exit: Save your changes and exit the programming mode.
Testing
Use a multimeter to verify the voltage levels during each charging stage.
Setting Up Your Renogy Inverter

While the charge controller regulates the charging process, the inverter needs to be configured to recognize the battery type. This is less critical than charge controller settings, but important for accurate battery state-of-charge readings.
Step 1: Access Inverter Settings
Refer to your Renogy inverter manual for instructions on accessing the settings menu.
Step 2: Battery Type Selection
Locate the “Battery Type” or “Battery Setting” option and select “AGM.”
Step 3: Voltage Range Configuration
Some inverters allow you to specify the battery voltage range. Ensure it matches your Renogy AGM battery’s voltage specifications.
Pro Tips for Renogy AGM Battery Optimization
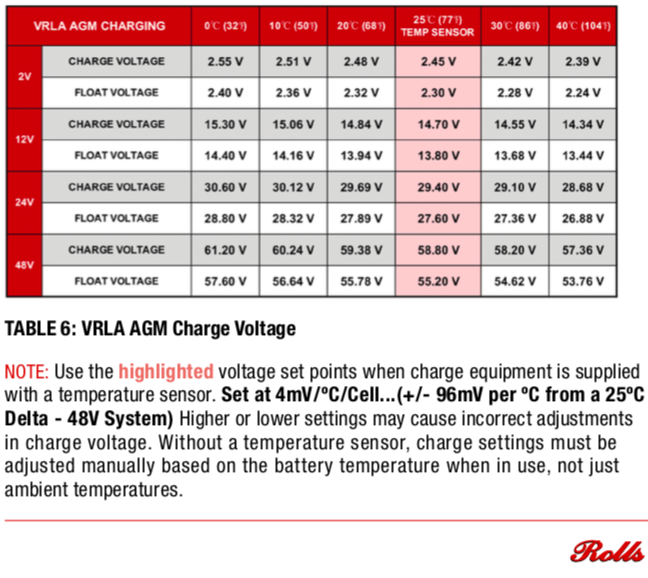
- Temperature Compensation: Many charge controllers offer temperature compensation. Enable this feature to adjust the charging voltage based on ambient temperature. Lower voltages are needed in warmer temperatures, and higher voltages in colder temperatures.
- Avoid Deep Discharges: While AGM batteries are more tolerant of deep discharges than flooded batteries, consistently draining them below 50% capacity will shorten their lifespan.
- Regularly Monitor Voltage: Use a multimeter to periodically check the battery voltage and charging status.
- Proper Ventilation: Although AGM batteries are sealed, they can still release small amounts of hydrogen gas during charging. Ensure adequate ventilation in the battery compartment.
- Use Correct Cable Size: Use appropriately sized cables to minimize voltage drop and ensure efficient charging.
- Consider a Battery Monitor: A battery monitor provides detailed information about battery voltage, current, state of charge, and remaining capacity.
When to Seek Professional Help

- Consistent Charging Issues: If you’ve tried all the troubleshooting steps and are still experiencing charging problems.
- Battery Swelling or Leaking: This indicates a serious issue and requires immediate attention.
- Unusual Odors: A sulfurous smell could indicate a problem with the battery.
- Inverter Fault Codes: If your inverter displays error codes that you don’t understand.
FAQ
Q: Can I use a charge controller designed for flooded lead-acid batteries with AGM batteries?
A: While it might work, it’s not recommended. Flooded lead-acid charging profiles typically have lower voltage settings that can lead to undercharging and sulfation of AGM batteries.
Q: How often should I equalize my AGM batteries?
A: Equalization is generally not recommended for frequent use with AGM batteries. If your battery specifications allow it, consider doing it once every 3-6 months.
Q: What happens if I overcharge my AGM battery?
A: Overcharging can cause gassing, electrolyte loss, and premature battery failure. This is why proper charge controller settings are crucial.
Q: What is the best depth of discharge for AGM batteries?
A: It’s best to avoid discharging AGM batteries below 50% capacity to maximize their lifespan.
Get Your Renogy AGM Batteries Working Optimally
By following this guide, you’ve learned how to properly configure your Renogy charge controller and inverter for optimal AGM battery performance. Remember to consult your specific product manuals for detailed instructions.
- Understanding the key voltage settings (Bulk, Absorption, Float)
- Configuring your charge controller correctly
- Monitoring your battery’s performance
Don’t let incorrect settings compromise your investment. Implement these recommendations, and you’ll enjoy years of reliable power from your Renogy AGM batteries.
Have you successfully optimized your Renogy AGM battery settings? Share your experience and any helpful tips in the comments below!