
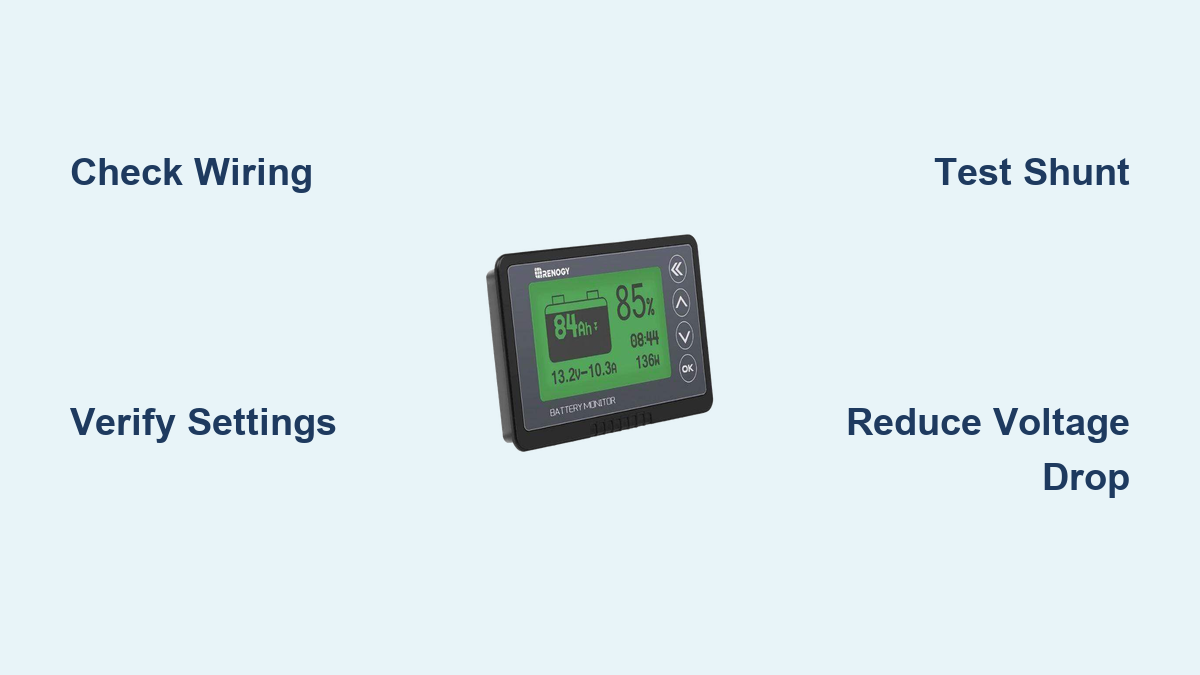
Are you frustrated that your Renogy battery monitor isn’t displaying accurate readings? It’s incredibly unsettling when you can’t trust the information about your battery’s state of charge, especially when relying on off-grid power. A quick fix often involves checking the wiring connections, but the issue can be more complex.
This comprehensive guide will walk you through diagnosing and resolving the most common reasons why your Renogy battery monitor isn’t reading correctly. We’ll cover everything from simple troubleshooting steps to more advanced solutions, ensuring you regain confidence in your system’s performance and avoid potential battery damage. By the end of this article, you’ll be equipped to accurately monitor your battery bank and optimize your power usage.
Common Causes of Renogy Battery Monitor Not Reading Correctly
Several factors can contribute to inaccurate readings from your Renogy battery monitor. Here’s a breakdown of the most frequent culprits:
Incorrect Wiring Connections
This is the most common issue. Even a slightly loose or incorrectly connected wire can throw off the readings. Pay close attention to polarity.
Incorrect Battery Settings
The monitor must be configured with the correct battery type, voltage, and capacity. An incorrect profile will lead to inaccurate state-of-charge calculations.
Shunt Resistance Issues
The shunt is a critical component for accurate current measurement. Damage, corrosion, or improper installation of the shunt can significantly affect readings.
Voltage Drop in Wiring
Long wire runs or undersized wiring can cause a voltage drop, leading to inaccurate voltage readings at the monitor.
Monitor Firmware Issues
Occasionally, bugs in the monitor’s firmware can cause incorrect readings.
How to Fix Renogy Battery Monitor Not Reading Correctly
Let’s dive into solutions, starting with the easiest fixes and moving towards more complex troubleshooting.
Method 1: Check Wiring Connections (Quick Fix)
Diagnosing the Issue: Visually inspect all wiring connections between the battery, shunt, and monitor. Look for loose terminals, corrosion, or frayed wires.
Fix Steps:
1. Power Down: Disconnect the power source to the battery monitor.
2. Inspect Connections: Carefully check all connections at the battery terminals, shunt, and monitor.
3. Tighten Connections: Ensure all terminals are securely tightened.
4. Clean Connections: If you see corrosion, clean the terminals with a wire brush and apply dielectric grease.
5. Reconnect: Reconnect the power source and observe the monitor.
Testing: Monitor the voltage and current readings after reconnecting. If the readings are still inaccurate, move on to the next method.
Method 2: Verify Battery Settings
Diagnosing the Issue: Incorrect battery settings can lead to wildly inaccurate state-of-charge calculations.
Fix Steps:
1. Access Settings: Refer to your Renogy battery monitor’s manual to access the settings menu.
2. Battery Type: Confirm the battery type is correctly selected (e.g., AGM, Gel, Lithium).
3. Battery Voltage: Verify the battery voltage matches your battery bank’s nominal voltage (e.g., 12V, 24V, 48V).
4. Battery Capacity: Enter the correct battery capacity in Amp-hours (Ah).
5. Save Changes: Save the updated settings and restart the monitor.
Testing: Observe the monitor over a charging/discharging cycle to see if the readings improve.
Method 3: Inspect and Test the Shunt

Diagnosing the Issue: The shunt is a low-resistance resistor used to measure current. A faulty shunt is a common cause of inaccuracies.
Fix Steps:
1. Power Down: Disconnect the power source to the battery monitor.
2. Inspect Shunt: Visually inspect the shunt for any signs of damage, corrosion, or overheating.
3. Check Connections: Ensure the shunt is securely connected to the negative battery terminal and the monitor.
4. Voltage Drop Test: Using a multimeter, measure the voltage drop across the shunt while a load is connected. The voltage drop should be consistent with the shunt’s specification (usually 0.05V at 100A).
5. Replace Shunt: If the shunt is damaged or the voltage drop is incorrect, replace it with a new one of the same specification.
Testing: After replacing or verifying the shunt, reconnect the power source and observe the current readings.
Method 4: Address Voltage Drop in Wiring
Diagnosing the Issue: Long wire runs or undersized wiring can cause a significant voltage drop, leading to inaccurate voltage readings.
Fix Steps:
1. Measure Voltage Drop: Using a multimeter, measure the voltage at the battery terminals and then at the monitor’s terminals while a load is connected. A significant difference indicates voltage drop.
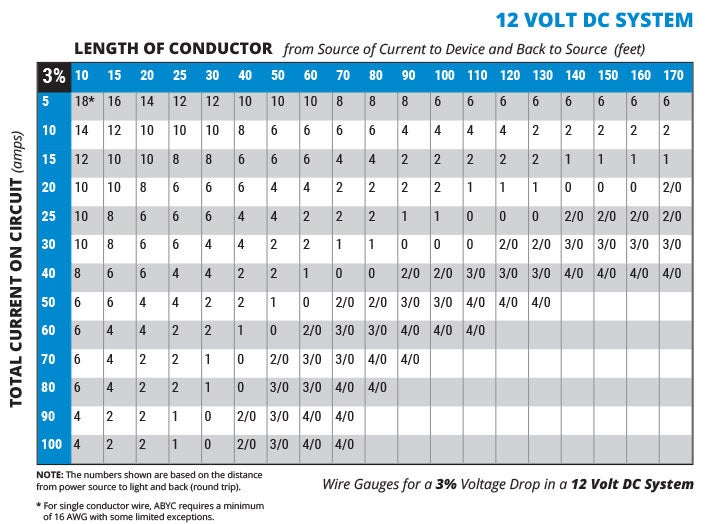
2. Upgrade Wiring: Replace undersized wiring with thicker gauge wire to reduce resistance.
3. Shorten Wire Runs: If possible, shorten the wire runs between the battery and the monitor.
4. Use Proper Terminations: Ensure all connections are tight and use appropriate terminals to minimize resistance.
Testing: Monitor the voltage readings after upgrading the wiring.
Prevention Tips and Maintenance Advice

- Regularly Inspect Wiring: Check for loose connections, corrosion, and frayed wires at least every six months.
- Keep Terminals Clean: Clean battery terminals and connections with a wire brush and apply dielectric grease.
- Verify Settings Annually: Double-check your battery settings annually, especially after making changes to your battery bank.
- Protect Shunt: Shield the shunt from moisture and physical damage.
- Use Proper Wiring Gauge: Always use the appropriate wire gauge for the current load and distance.
Pro Tips
- Use a Known Good Multimeter: When troubleshooting, use a reliable multimeter to verify readings from the battery monitor.
- Check Firmware Updates: Regularly check the Renogy website for firmware updates for your battery monitor.
- Document Your System: Keep a detailed record of your battery bank configuration, wiring diagrams, and monitor settings.
- Consider a Remote Display: If you have a large system, consider using a remote display for the battery monitor for easier access to information.
- Avoid Mixed Battery Types: Using different battery types in the same bank can lead to inaccurate readings and damage.
Professional Help
If you’ve tried these troubleshooting steps and your Renogy battery monitor is still not reading correctly, it may be time to seek professional help.
Signs You Need a Professional:
* You suspect internal damage to the monitor.
* You’re uncomfortable working with electrical systems.
* You’ve checked everything and still can’t identify the problem.
What to Look For: A qualified solar installer or electrician experienced with battery monitoring systems.
Typical Cost Ranges: $75 – $200 per hour for diagnostics and repairs.
FAQ
Q: My monitor shows a negative current reading. What does this mean?
A: A negative current reading usually indicates that the polarity of the shunt connection is reversed. Double-check the wiring to ensure the shunt is connected correctly.
Q: The voltage reading is fluctuating wildly. What could be the cause?
A: This could be due to loose connections, a faulty shunt, or interference from other electrical devices.
Q: How do I calibrate my Renogy battery monitor?
A: Calibration procedures vary depending on the model. Refer to your monitor’s manual for specific instructions.
Q: Can I use a battery monitor with a hybrid battery bank (e.g., lithium and AGM)?
A: It’s generally not recommended to use a single monitor with a hybrid battery bank. It can lead to inaccurate readings and potentially damage your batteries.
Get Your Renogy Battery Monitor Working Again
By systematically working through these troubleshooting steps, you should be able to identify and resolve the issue with your Renogy battery monitor. Remember to prioritize safety, double-check your work, and consult a professional if needed. Accurate battery monitoring is crucial for maximizing your system’s performance and ensuring the longevity of your batteries.
Have you successfully fixed your Renogy battery monitor? Share your experience in the comments below to help other readers!