

Are you experiencing issues with your Renogy DC to DC charger? A malfunctioning charger can leave you stranded with a dead auxiliary battery, disrupting your off-grid adventures or emergency preparedness. A quick fix often involves checking the basic connections, but more complex problems may require deeper investigation.
This comprehensive guide will walk you through troubleshooting common issues with Renogy DC to DC chargers. We’ll cover everything from simple connection checks to advanced diagnostic steps, ensuring you can pinpoint the problem and get your charging system back online. By the end of this article, you’ll have the knowledge and confidence to resolve most issues yourself, saving you time and money.
Common Causes of Renogy DC to DC Charger Malfunction
Several factors can cause a Renogy DC to DC charger to stop working correctly. Here’s a breakdown of the most frequent culprits:
Loose or Corroded Connections
This is the most common issue. Vibration, weather exposure, and improper installation can lead to loose wiring or corrosion on terminals.
Blown Fuse
A blown fuse in either the input (source) or output (battery) circuit is a common safety mechanism triggered by overcurrent or a short circuit.
Low Input Voltage
If the source voltage (e.g., alternator) is too low, the charger won’t operate correctly, or may shut down to protect itself and your batteries.
Battery Issues
A failing or deeply discharged battery can sometimes appear as a charger problem. The charger may not recognize the battery or may struggle to charge it.
Charger Overheating
Prolonged use in high temperatures without adequate ventilation can cause the charger to overheat and shut down.
Internal Component Failure
Though less common, internal components within the charger can fail over time.
How to Fix Renogy DC to DC Charger Issues
Here are several methods to troubleshoot and fix your Renogy DC to DC charger, ranging from simple checks to more advanced procedures.
Method 1: Quick Connection Check
This is the first and easiest troubleshooting step.
Diagnosing the Issue
Visually inspect all wiring connections at the charger, the source (alternator/solar panel), and the battery. Look for loose terminals, corrosion, or damaged wires.
Fix Steps
- Disconnect power: Disconnect the negative terminal of both the source and the battery before working on the wiring.
- Tighten Connections: Use appropriate tools to securely tighten all connections.
- Clean Corrosion: Use a wire brush or sandpaper to remove any corrosion from terminals. Apply dielectric grease to prevent future corrosion.
- Inspect Wires: Check for any frayed or damaged wires. Replace damaged wires with appropriately sized replacements.
- Reconnect Power: Reconnect the negative terminals, ensuring proper polarity.
Testing
Turn on the source and verify the charger is functioning. Check the battery voltage to confirm charging is occurring.
Method 2: Fuse Replacement
A blown fuse is a simple fix, but it’s crucial to identify why the fuse blew.
Diagnosing the Issue
Check the fuses on both the input and output sides of the charger. A blown fuse will have a broken filament.
Fix Steps
- Disconnect Power: Disconnect the negative terminal of both the source and the battery.
- Locate Fuses: Identify the fuse holder(s) on the charger.
- Remove Blown Fuse: Carefully remove the blown fuse.
- Install Replacement Fuse: Replace the blown fuse with a fuse of the exact same amperage rating. Never use a higher amperage fuse.
- Reconnect Power: Reconnect the negative terminals.
Testing
Turn on the source and verify the charger is functioning. If the fuse blows again immediately, there’s likely a short circuit or other underlying issue that needs further investigation.
Method 3: Voltage Verification
Ensuring proper input voltage is crucial for charger operation.
Diagnosing the Issue
Use a multimeter to measure the voltage at the charger’s input terminals while the source is running. Compare the measured voltage to the charger’s specified input voltage range (refer to the Renogy documentation).
Fix Steps
- Verify Source Voltage: Ensure the source (alternator or solar panel) is providing the correct voltage. If the voltage is too low, troubleshoot the source itself.
- Check Wiring: Verify the wiring between the source and the charger is appropriately sized and in good condition. Undersized wiring can cause voltage drop.
Testing
With the correct input voltage present, verify the charger is functioning.
Method 4: Battery Health Assessment
A failing battery can mimic a charger malfunction.
Diagnosing the Issue
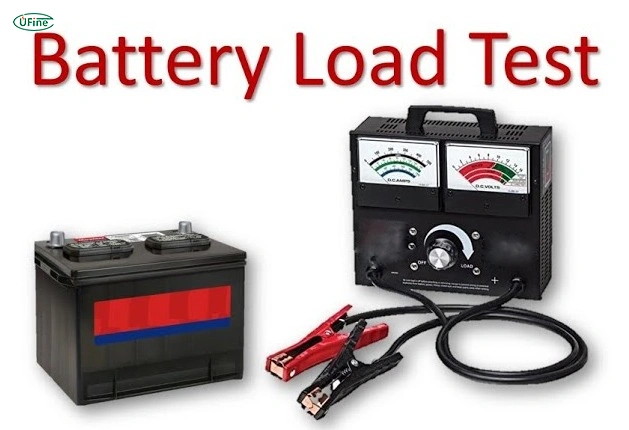
Use a multimeter to check the battery voltage. A fully charged 12V battery should read around 12.6-12.8V. Also, perform a load test on the battery to assess its ability to hold a charge under load.
Fix Steps
- Charge Battery: If the battery is deeply discharged, attempt to charge it with a separate charger.
- Load Test: If the battery fails a load test, it likely needs to be replaced.
Testing
With a healthy, charged battery, verify the charger is functioning.
Prevention Tips and Maintenance Advice
- Regular Inspection: Inspect wiring connections and fuse condition every 3-6 months.
- Clean Terminals: Clean battery terminals and charger connections regularly to prevent corrosion.
- Proper Ventilation: Ensure the charger has adequate ventilation to prevent overheating.
- Correct Wiring Size: Use appropriately sized wiring for the current draw.
- Avoid Overloading: Do not exceed the charger’s maximum output current.
- Dielectric Grease: Apply dielectric grease to connections to prevent corrosion.
Pro Tips
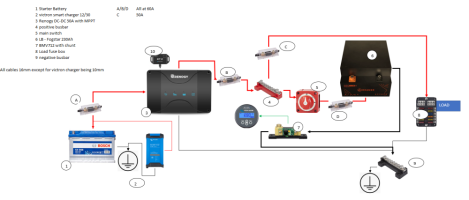
- Use a Wiring Diagram: Refer to the Renogy wiring diagram for your specific model when troubleshooting.
- Check the Charger’s Manual: The manual contains valuable information about troubleshooting and specifications.
- Isolate the Problem: Disconnect the battery from the charger to see if the charger is at least attempting to operate.
- Avoid Direct Sunlight: Keep the charger out of direct sunlight to prevent overheating.
- Consider a Battery Monitor: A battery monitor can provide valuable insights into battery health and charging status.
- Don’t Ignore Warnings: Pay attention to any warning lights or error codes displayed by the charger.
Professional Help
Sometimes, despite your best efforts, the charger may require professional attention.
Signs You Need a Pro
- Repeated fuse blowing
- Internal component failure (visible damage)
- Inability to diagnose the problem
- Charger still not functioning after trying multiple fixes
Finding a Qualified Technician
Look for an RV repair shop, marine electronics technician, or a qualified automotive electrician with experience in DC charging systems.
Cost Range
Repair costs can vary depending on the extent of the damage, but typically range from $50 – $200 for minor repairs to $150+ for component replacement.
FAQ
Q: My Renogy charger is making a buzzing sound. What could be the cause?
A: A buzzing sound often indicates loose wiring or a failing internal component. Check all connections and if the problem persists, contact Renogy support.
Q: The charger shows a green light but the battery isn’t charging. What should I do?
A: A green light typically indicates the charger is operating, but it doesn’t necessarily mean it’s charging the battery. Check the battery voltage and health, and verify the connections between the charger and the battery.
Q: What does the error code E1 mean on my Renogy DC to DC charger?
A: Error code E1 typically indicates an overvoltage or undervoltage condition. Check the input voltage and ensure it’s within the charger’s specified range.
Q: Can I use a higher amperage fuse if the original blows repeatedly?
A: Never use a higher amperage fuse. This can create a dangerous situation and potentially damage the charger or your electrical system.
Get Your Renogy DC to DC Charger Working Again
By following this guide, you now have a comprehensive understanding of how to troubleshoot common issues with your Renogy DC to DC charger. Remember to start with the simplest checks – connections and fuses – and work your way through the more advanced troubleshooting steps. Don’t hesitate to seek professional help if you’re uncomfortable or unable to resolve the problem yourself.
Have you successfully fixed your Renogy DC to DC charger? Share your experience in the comments below to help other readers!